If you have to hold your handle down to flush, then this is likely because the flapper Flappers were a generation of young Western women in the 1920s who wore skirts, bobbed their hair, listened to jazz, and flaunted their disdain for what was then considered acceptable behavior. Flappers were seen as brash for wearing excessive makeup, drinking, smoking cigarettes, driving automobiles, treating sex in a casual manner, and otherwise flouting social and sexual norms. Flappers are icons of th…Flapper
Why is it hard to push handle down on toilet?
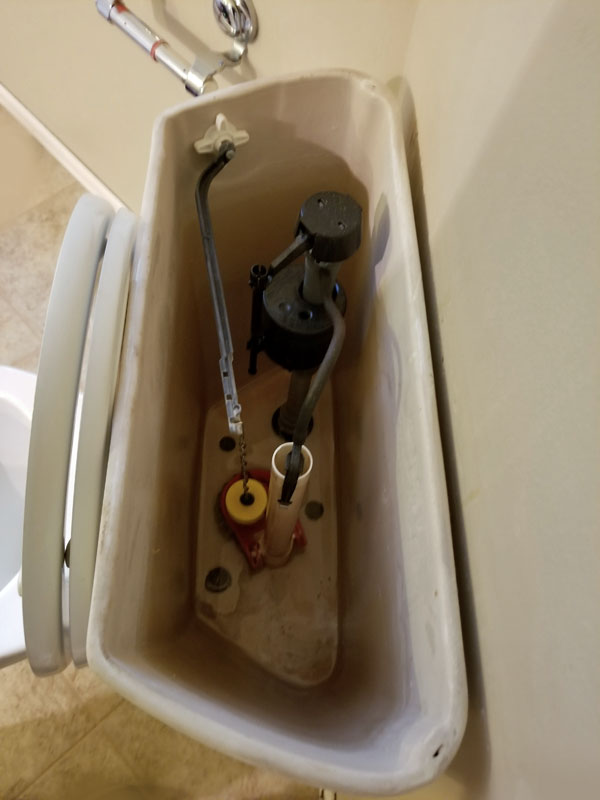
The Flush Handle is what you push down on to create a flush. It is the effort arm of the flush lever. The Trip Lever is the bar inside the tank, and attached to the Flush Handle. Pushing down on the handle makes the Trip Lever pull up on Flapper Chain. It is the load arm of the flush lever.
How to repair a stuck handle on a toilet?
To fix this problem, 'you will need to remove the cover of the toilet tank and clear any debris from the impeller. You can do this by reaching in and manually moving it around. If it is difficult to reach, you can try using a coat hanger or other small tool to dislodge the obstruction.
How to flush a toilet with no handle?
- Remove the toilet tank lid and place it somewhere safe.
- In case there’s no water in the tank, or if there’s not enough of it, fill a bucket with water and pour it into the tank. ...
- Pull the chain (or lift the flapper manually, if needed) and you’ll successfully flush your toilet without touching the broken handle.
How you should handle an unused bathroom?
To help with security at the airport:
- Keep medicine in the original bottles.
- Ask your health care provider for a copy of all your prescriptions. You may need this in case you lose, run out, or damage your medicine.
- If you have diabetes, ask your provider for a letter explaining that you have diabetes and providing a list of all your supplies. ...
:max_bytes(150000):strip_icc()/drain_water-56a73bad5f9b58b7d0e810db.jpg)
Where is the flush valve on a toilet?
In your toilet tank, there is the flush valve – the large opening at the bottom of the tank – and a rubber or vinyl flapper.
Why does my toilet not flush?
If the toilet doesn’t flush completely unless you hold the handle down for the entire flush cycle, it’s usually because the flapper is not fully lifting away from the flush valve. This problem is caused by too much slack in the lifting chain that connects the flush lever to the flapper.
What is a flapper in a toilet?
The flapper is designed to lift up from the flush valve when the toilet handle is pressed down in order to start the flush cycle. At the end of the cycle, the flapper should settle back down into the flush valve, sealing it tightly until the next flush cycle is initiated.
PROBLEM
When you press down on the toilet handle, chain that is attached to it pulls up a toilet flapper (a.k.a. tank ball).
SOLUTION
Flappers are made from rubber and it degrades over time, especially in a mineral rich, wet-environment. The degradation allows rubber to lose its floating capability so to solve this problem, we need to replace it (during the removal process, the old flapper literally disintegrated in my hand – see fig. 1.1).
Required Tools and Materials
I tried bunch of different flappers and found Korky to be the best. I chose the repair kit version, just in case I needed to put on a new rim.
ALL-THUMBS-DIY-STEPS
Before replacing the flapper ball, gently scour the seat or rim, of the outlet valve with paper towel. If there are any remaining deposits, soak a sponge in a 50/50 mix solution of hot water and vinegar and to gently scour the rim again; Do not use a steel wool or scouring pads as they may score the rim, resulting a leak;
WRAP UP
Korky flapper repair kit comes with a tube of silicone and a new seat. If your seat is nicked or otherwise damaged, you may want to use these parts to ensure that your new flapper does not leak.
Affiliate Programs Keeps AllThumbsDIY Free
AllThumbsDIY.com participates in the Amazon Services LLC Associates Program, an affiliate advertising program designed to provide a means for sites to earn advertising fees by advertising and linking to Amazon.com.

Problem

Solution
- Flappers are made from rubber and it degrades over time, especially in a mineral rich, wet-environment. The degradation allows rubber to lose its floating capability so to solve this problem, we need to replace it (during the removal process, the old flapper literally disintegrated in my hand – see fig. 1.1).
Required Tools and Materials
- Pair of latex or Nitrile gloves;
- Sponge;
- Vinegar;
- Korky Universal Flapper Repair Kit– Fig. 1.2
All-Thumbs-Diy-Steps
- Shutoff the toilet water supply;
- Flush the toilet to drain the water in the tank;
- Disconnect the trip lever chain from the flapper;
- Slip off the flapper’s collar from the overflow pipe;
Wrap Up
- Korky flapper repair kit comes with a tube of silicone and a new seat. If your seat is nicked or otherwise damaged, you may want to use these parts to ensure that your new flapper does not leak. If you found this article to be useful, can you do me a favor and sign up for my newsletter? The signup form is found at the top of the screen on the right side. Good luck with your repair an…
Step 1 – Turn Off The Water
- You can do this by unscrewing the valve which can be found under the base of the tank, and then flushing the toilet in order to get rid of as much of the water as you can from the system. You can take out the rest of the water, or flush again to get rid of the last piece. You may also use a towel or sponge to soak up the remaining water.
Step 2 – Unscrew The Handle
- In order to do this, you must disconnect the mechanism which connects the handleto the flush valve. Remove this connection, which is usually plastic, and you should then be able to locate the nut which holds the handle onto the toilet. Unscrew this using your wrench, [usually left-hand thread] and then pull out the nut and the handle at the same ti...
Step 3 – Replace The Handle
- Once you have decided to discard the old handle, you will need to replace the part. Unscrew the bolt from the new handle using your screwdriver, and then push the handle through the hole in the toilet. Your bolt should screw on manually at first, and then more tightly onto the base of the handle using the wrench. You should then attempt to reconnect the plastic link, although this ma…
Step 4 – Finishing
- Before you finish the project, you will have to replace the water into the tank and turn on the water at the valve again. When this is done, wait for the tank to fill up, and then use your new handle to empty the tank. If you have correctly fitted the handle, you should be able to see the water flow through to the bowl, and there should be no problem.