To hook everything up, connect these wires:
- Connect TX on the ESP8266 to TX on the Arduino Uno.
- Connect RX on the ESP8266 to RX on the Arduino Uno.
- Connect EN on the ESP8266 to 3.3V on the Arduino Uno
- Connect 3v3 (or VCC) on the ESP8266 to 3.3V on the Arduino Uno.
- Connect GND on the ESP8266 to GND on the Arduino Uno.
- Connect TX on the ESP8266 to TX on the Arduino Uno.
- Connect RX on the ESP8266 to RX on the Arduino Uno.
- Connect EN on the ESP8266 to 3.3V on the Arduino Uno.
- Connect 3v3 (or VCC) on the ESP8266 to 3.3V on the Arduino Uno.
- Connect GND on the ESP8266 to GND on the Arduino Uno.
How do I verify that the ESP8266 module can connect to my router?
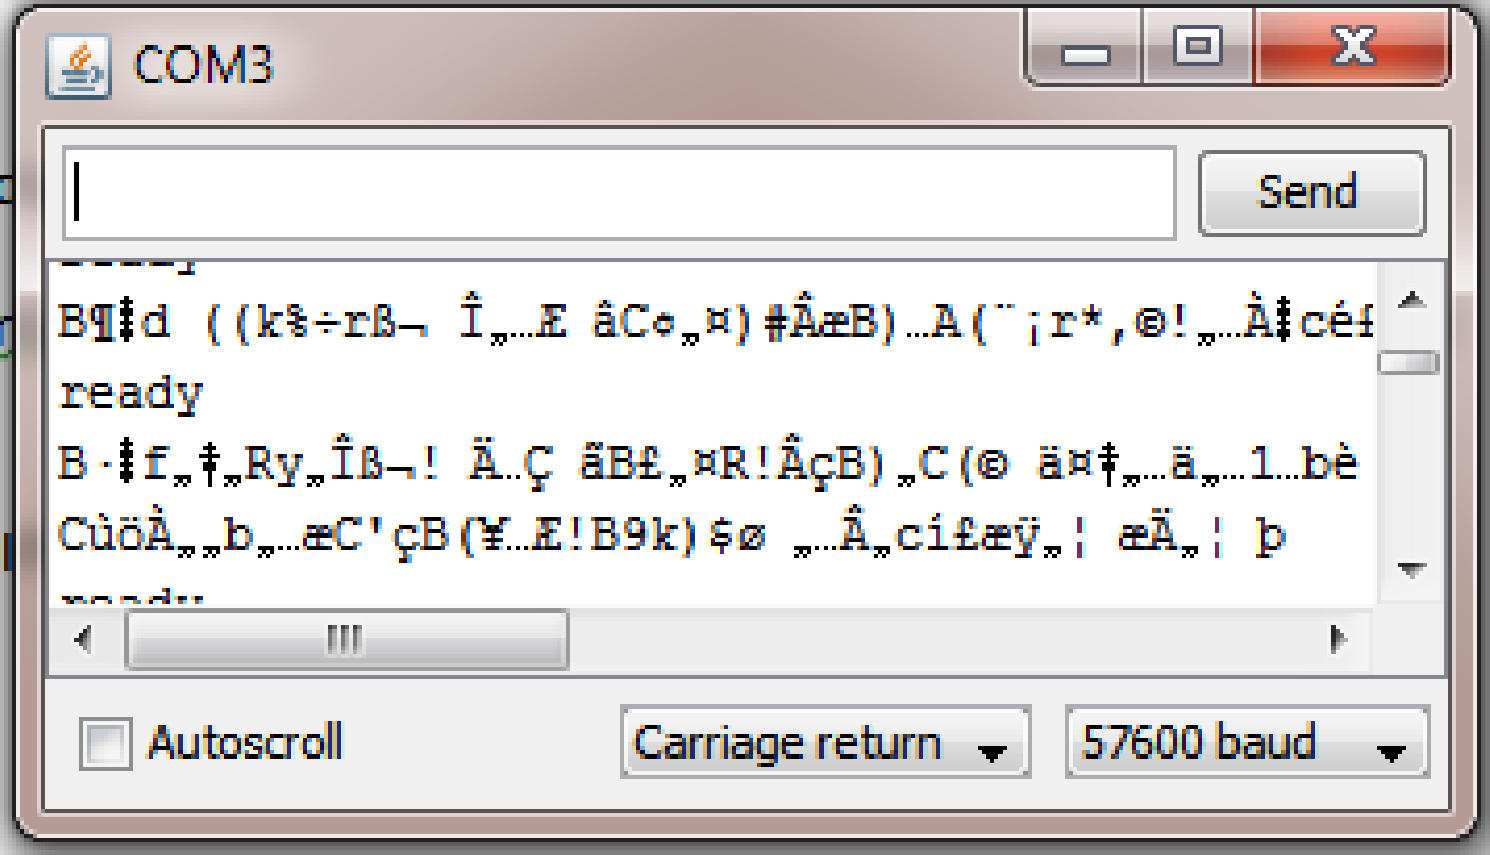
We will also verify that the ESP8266 module can connect to our router. With your Arduino Uno connected to your computer, open the serial monitor via the Arduino IDE (ctrl + shift + m). On the bottom of the serial monitor there are dropdowns for line endings and baud rate.
How to send JSON data to the ESP8266 using Arduino Uno?
Sending JSON Data to the ESP8266. 1 1. Under the Quick Access menu, click New project. 2 2. On the Project Wizard dialog: 3 a. Enter a project name in the Name field. 4 b. Select Arduino Uno from the Board dropdown. 5 c. Click Finish. More items
What do I need to set up an Arduino ESP?
Lastly, some jumper wires and a USB cable to connect the Arduino to the PC are also necessary. Unfortunately, in order to program the ESP, you'll need a way to connect it's GND Pin and GPIO0 Pin. I managed to solder a tiny switch that let's you choose if you want to be in "Program mode" or not.
What is your first project with the ESP8266?
Your first project with the ESP8266: connect to your home's WiFi. You got the ESP8266 wifi module but have absolutely no idea how to make it work or what to do with it.

How to connect ESP8266 to PC?
Plug your ESP into the USB adapter and plug that into your PC. Make sure its not in "Program mode"! Go to Tools and change the Board to Generic ESP8266 Module. Make sure the correct Port is selected and then open up the Serial Monitor (Ctrl + Shift + M) and set the following settings:
What cable connects Arduino to PC?
USB cable to connect Arduino and PC
How to connect USB adapter to GPIO0?
Turn the USB adapter upside down, and solder the two legs of the switch to the GND Pin and GPIO0 Pin. Be careful to not connect other pins as it might not work later on.
Why is Sketch for Arduino Uno?
Sketch for the Arduino Uno in order to talk with the ESP
What pin is RX on Arduino?
Pin 3 on the Arduino to Pin RX on the Adapter
Is pin 0 free?
While uploading code to your Arduino, Pin 0 (RX) has to be free!
What is an ESP8266?
ESP8266 - Setup and First WiFi Connection. Your first project with the ESP8266: connect to your home's WiFi. internet of things.
Where does 5V power go on Arduino?
5V Power rail could go to Vin on the arduino.
Can you power an ESP8266?
IMPORTANT - DON'T POWER THE ESP8266 USING THE ARDUINO'S 5V PIN. USE IT'S 3.3V PIN OR BETTER USE A BREADBOARD POWER SUPPLY. BE CAREFUL WITH THE CONNECTIONS.
How to install ESP8266?
First, install ESP8266 to Arduino IDE. If you have already installed the board to boards manager of Arduino IDE, skip this step else follow the steps. Start the Arduino IDE. Go to File > Preferences.
What pin to connect blink LED?
After the Arduino IDE shows done uploading of Blink LED program, connect the LED to GPIO_2 Pin of ESP8266. Please do not connect the LED before or at the time of uploading program, it can cause some issue in uploading program.
Is ESP8266 in Arduino IDE?
Installation of ESP8266 in Arduino IDE is done.
What voltage to connect ESP8266?
Connect 3v3 (or VCC) on the ESP8266 to 3.3V on the Arduino Uno.
Can you upload ESP8266 to Arduino?
For this guide, we’ll be communicating with the ESP8266 directly, so instead of uploading a sketch to your Arduino, upload the default blank sketch that new Arduino files come with (or copy the code below). This will clear out any instructions you currently have running on your Arduino, so you can start fresh.
Do I need a separate Arduino board for Wi-Fi?
There are several ways to add Wi-Fi to an Arduino project and depending on your needs, you might not need a separate board at all. Some Arduino boards like the Arduino Uno WiFi have Wi-Fi capabilities out of the box. However, most Arduino boards do not, so if you want to connect them to the internet, you’ll need a separate Arduino Wi-Fi module.
Can I connect my Arduino to Wi-Fi?
Most of the devices you own can connect to Wi-Fi, but your Arduino sits on its lonesome. If you want to add Wi-Fi to Arduino projects, you can do so with an Arduino Wi-Fi module, a Wi-Fi shield, or in some cases even an Arduino board that comes with Wi-Fi built in. In this guide, we’ll show you how to wire up a Wi-Fi module and instruct it to connect to Wi-Fi.
Can you use Wi-Fi shields on Arduino?
You can still find some Arduino Wi-fi shields around, although the product has been officially retired. Barring that, the easiest way to add Wi-Fi to Arduino projects is with an Arduino Wi-Fi module like the ESP8266. These microcontrollers can be flashed with a variety of custom firmware that give you a ton of power over how to connect to the internet.
Can Arduino use Wi-Fi?
While there are many Arduino Wi-Fi projects that use a variety of methods to connect to the internet, we’re going to use an Arduino Wi-Fi module to add Wi-Fi support to a board that doesn’t already have it. As such, here’s what you’ll need:
How to get ESP8266 to work?
Specifically, we will be changing the ESP8266 to work as an access point and a client and changing the baud rate. Since most code samples out there are communicating with the ESP module with a baud rate of 9600, that’s what we will use. We will also verify that the ESP8266 module can connect to our router.
What pins do you need to connect to ESP?
In order to communicate with the ESP Module, we need to connect the TX and RX Lines to Digital Pins. You may use any two pins from 8-13, but for this tutorial I will be using pin 11 for RX and pin 10 for TX.
How to change baud rate on Arduino Uno?
With your Arduino Uno connected to your computer, open the serial monitor via the Arduino IDE (ctrl + shift + m). On the bottom of the serial monitor there are dropdowns for line endings and baud rate. Set line endings to “Both NL & CR” and change the baud rate to “115200”. Then send the following commands:
What is the baud rate of ESP8266?
5. Verify that the ESP8266 is communicating with baud rate of 9600.
How to connect to a JSON file?
We continuously wait for a client to connect. Once a client is connected: 1 Print that a client has connected 2 Parse the incoming request 3 Search the request for the opening JSON bracket 4 Read in request until closing JSON bracket is found 5 Add brackets back around the JSON data 6 Use the ArduinoJSON library to convert our JSON string into a JSON object 7 NOTE: If you change the JSON request format at all, you will need to re-calculate your buffer size using this tool 8 Get and print the value of the “action” key in our JSON object. 9 Print a different message based on what the value of the action key was
What is the most popular Arduino?
When it comes to connecting your Arduino to the internet there are many options, but one of the most popular and widely available is the ESP8266.
Does PlatformIO work with Arduino?
The code provided should also work in the standard Arduino IDE, but for the actual coding portion of this guide, I’d recommend PlatformIO via VS Code since it has better built in formatting, it’s easier to add packages, and most importantly, it has a dark theme. As far as a REST Client goes, I’ve been using Insomnia, but other clients such as Postman will work just as well.
ESP-12F: ESP8266 Module - Connection Test
ESP-12F: ESP8266 Module - Connection Test: This instructable will show you the first steps in order to use and test an ESP8266 ESP-12F module.I put here just the thinks to know... mainly also to rembember myself what I did.This will show only how to...
ESP-12F: ESP8266 Module - Connection Test
ESP-12F: ESP8266 Module - Connection Test: This instructable will show you the first steps in order to use and test an ESP8266 ESP-12F module.I put here just the thinks to know... mainly also to rembember myself what I did.This will show only how to...
