How to Install Shiplap
- Calculate how much plywood you’ll need for your shiplap walls.
- Buy ¾-inch AC plywood. Plywood is rated by quality, with “A” being the highest quality and suitable for the visible side of your shiplap boards.
- Gear up. Don goggles and a dust mask before cutting and sanding wood. ...
- Rip your plywood into shiplap boards. Measure the plywood sheets precisely...

How to install a very simple shiplap ceiling?
Stagger Cuts
- Cut and place boards to stagger cut ends from row to row. Repeat until wall is complete.
- If two boards meet at the same stud, place the first piece halfway onto the stud and nail. Start the next piece on the same stud. ...
- Never overlap boards.
Can you use shiplap instead of drywall for interior walls?
You may even find shiplap behind drywall, as shiplap used to be used for the inside of houses, and has seen a resurgence in recent years, due to its aesthetic. So while shiplap may not be as viable as a wall’s building material, evident in its replacement over the years, it still can be used.
How do you attach shiplap to drywall?
- If you’re installing shiplap from the top of the wall down, you’ll need to carefully hold the nickels in place on the bottom of the board as you line up ...
- Alternatively, you could use scrap plexiglass pieces cut into strips, stacked to the desired thickness, and glued together as spacers. ...
- If you’re installing actual shiplap siding, skip this step. ...
Does shiplap go over drywall?
Usually, shiplap does go over drywall, and this is for a number of reasons. Often, it is simply because the façade of a room is being changed, and drywall is already in place. It is not beneficial in any way to remove the drywall to place shiplap, so the majority of people simply place it over.

Do you nail or glue shiplap?
Place a nail through the top and bottom of each shiplap board where it crosses a stud. Use adhesive to glue the board down first or ask a partner to help you hold it in place.
What is the best way to attach shiplap?
Shiplap planks can be fastened to walls either vertically or horizontally. Simply nail through the drywall directly into wall studs. You can use construction adhesive when installing on ceilings or over other surfaces, as long as they're in good condition.
What should I put behind shiplap?
You only need drywall behind the shiplap if the building codes require you to do so. Although you may not need it, there are drawbacks to not having drywall behind your shiplap.
When installing shiplap do you start at the bottom or top?
bottomThe first key to installing shiplap is to always, always, always start at the bottom of your wall! This little piece of advice is actually good for two very important reasons. First, by starting at the bottom, it allows gravity to be a helpful aid as you work your way up the walls.
Should shiplap be nailed or screwed?
Nails are the best options when installing shiplap cladding. Trim nails are faster to install than screws since you do not need to predrill the material and won't be risking causing unsightly splits. They can also be easily covered or touched up if needed.
Should you glue shiplap to drywall?
Once you've found and marked the studs, begin sticking the pieces of shiplap in place using a heavy-duty adhesive. This gives you a tougher, more durable hold for your shiplap walls over drywall, and it also allows you to get a sense of board placement before you start nailing everything to the studs permanently.
What should I not do with shiplap?
1:058:5415 Shiplap Don'ts | What NOT to do When Installing Shiplap - YouTubeYouTubeStart of suggested clipEnd of suggested clipOff. Don't number 12 don't run your boards. In between two studs so if you need to make a cut andMoreOff. Don't number 12 don't run your boards. In between two studs so if you need to make a cut and join your shiplap. Together you need to make sure you cut your board to end on the stud.
What to the grooves on the back of shiplap for?
Grooves or recesses called rabbets are cut into the wood along the top and bottom of each board. These allow the pieces to fit together just right, forming a watertight seal.
Should I roll or brush shiplap?
If you painted the shiplap prior to installation, fill in holes and gaps after the shiplap is in place and then touch up these areas with paint. If the shiplap was already installed, paint it like wall (with a roller and cut in with a brush), taking extra time to paint the gaps and shiplap grooves with a small brush.
Do you leave a gap between shiplap?
Spacing the Boards: Enlist spacers to create uniform gaps (typically 1/8 inch) between each board. You can use any type of spacer you'd like, such as the edge of a carpenter's square or tile spacers. Make sure that you position each board using the same spacer so the boards appear evenly spaced.
Do you fill shiplap seams?
Fill Shiplap Seams With Caulk To create a seamless look, you'll want to make sure any gaps and edges are filled in with caulk, just like you would fill in nail holes with wood filler when affixing shiplap. Caulking the edges will create clean lines and a finished look.
Do you stagger seams on shiplap?
Stagger the shiplap boards so that the end joints are spread out along the wall or ceiling randomly. If you stack seams on top of each other, you'll create an eyesore that draws your eye to the dark lines of the jointed ends. Building pros agree that staggering seams provides a better looking aesthetic.
How do you secure a shiplap to the wall?
1:283:23How to Install Shiplap | The Home Depot - YouTubeYouTubeStart of suggested clipEnd of suggested clipBe sure to stagger the cut ends from row to row. Cut the boards to fit at the beginning or end of aMoreBe sure to stagger the cut ends from row to row. Cut the boards to fit at the beginning or end of a row if necessary.
What type of nails do you use for shiplap?
We recommend using 16- or 18-gauge finish or brad nails. 1-½” to 2” in length should be sufficient. Both gauges are strong enough to hold the lumber securely, but small enough to not leave a large hole on the face of the board.
Does shiplap need to be nailed to studs?
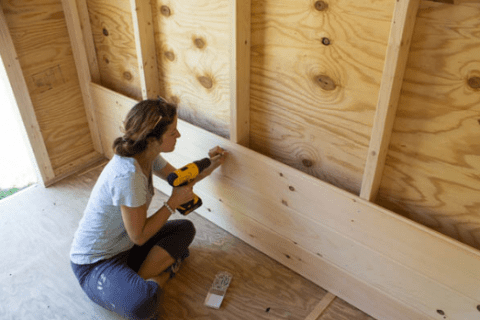
Step 5: Fasten Boards Now you need to get nailing and fasten each board to the wall! Grab your nail gun and nail each shiplap board to the wall on the studs (using those marks you made earlier). You want to ensure those nails line up with your wall studs. Nail through the nail line on the tongue of the product.
What type of nail gun do I need for shiplap?
Use a nail gun with 18 gauge 1 3/4”long brad nails. Nail through the top flange which is the longer of the two flanges. On the first board a second nail should be placed approximately 1” from the bottom edge.
Where to install shiplap?
Interior shiplap is generally installed in dry areas. If you wish to install the shiplap in bathrooms, sinks, or near wet areas of kitchens, make sure that it is either waterproof or that you apply a waterproofing treatment to the shiplap after installation.
How many screws are needed to install shiplap?
Floor-to-ceiling vertical strips of one-by-three softwood are initially screwed to the wall, four screws per board. Each strip placement mirrors the placement of the stud below. Finally, the shiplap is nailed horizontally over the furring strips.
What Is Shiplap?
Shiplap is exterior house siding that comes in long, horizontal boards that overlap each other at the long edges. A shiplap board overlaps the top 1/4-inch of its lower neighbor to create a joint that is weather-proof and stable.
What is interior shiplap board?
Interior shiplap board brings the charm of exterior shiplap indoors, with a few modifications. Interior shiplap is made from a softwood such as pine, hemlock, or a composite fiberboard, rendering it unsuitable for outdoors but perfect for interior use. Interior-use shiplap, too, is thinner than the exterior board.
How to condition shiplap?
Condition the Shiplap to the Room. Unbox and lay out the shiplap in the room where it will be installed to condition it to the room's temperature and humidity. Unwrap it from any outer plastic wrap. Give yourself room in front of the wall to work.
How high should shiplap be above the floor?
At the bottom of the wall, the last row of shiplap ideally will be parallel to the floor and about 1/8- inch to 1/4-inch above the floor. However, it is only coincidental if this truly happens. Generally, the last row might be higher than 1/4-inch or it might run at a slight angle to the floor.
What is shiplap siding?
Shiplap is exterior house siding that comes in long, horizontal boards that overlap each other at the long edges. A shiplap board overlaps the top 1/4-inch of its lower neighbor to create a joint that is weather-proof and stable. Interior shiplap board brings the charm of exterior shiplap indoors, with a few modifications.
How to smooth shiplap?
If you want a smooth look, fill the nail holes in the shiplap boards with spackle, smoothing it on with a putty knife or your finger. If you prefer the rustic look of exposed nail heads, skip this step.
What is shiplap wall?
Homeowners can’t seem to get enough of the shiplap look! The on-trend design that mimics historic shiplap—the horizontal planks used on the exterior of ships—is transforming bland walls in bedrooms, kitchens, and family rooms. Though most often seen in Old World, country-style, and rustic homes, shiplap is popping up everywhere these days.
How to cut a board to fit a wall?
Although you’d previously cut boards into eight-foot lengths, now you need to cut them to fit the dimensions of your wall. Measure the distance from the end of the previous board to the end of the wall, and then transfer that measurement to a new board. Use a chop saw or a circular saw to make a clean cut. Nail the second board in place using the same nailing pattern, and make sure its top edge is also aligned with the chalk guideline.
How far apart should drywall studs be?
The easiest way to pinpoint the location of the studs is with a stud finder. Standard wall studs are spaced either 16 inches or 24 inches apart, and you’ll need to locate and mark each one to serve as your nailing guide.
How to get uniform width plywood?
The trick to getting uniform-width boards is to snap a chalk line at the desired 5⅞ inches and then cut along the outside of the line. The blade of the saw will eat up ⅛-inch of the plywood. With meticulous measuring and cutting, you’ll get uniform results.
How to make a chalkboard with two nails?
(Work from left to right, or right to left, whichever is more comfortable for you.) Align the top edge of the board with the chalk guideline you created in the previous step. Insert two, evenly spaced, two-inch nails into the board directly over every chalk line.
How to make a gap between wood and floor?
Snap a horizontal chalk guideline at the bottom of the wall, six inches above the floor. This will give you a ¼-inch expansion gap between the bottom board and the floor. Wood tends to expand with humidity and temperature fluctuations, so it’s a good idea to leave an expansion gap. When installing the rest of the boards, you’ll also leave a small gap between them.
Prepare Walls
The first step in your shiplap accent wall is to remove everything from the wall including any nails. Use a putty knife to gently pry and remove baseboards, crown moulding and trim. Remove wall plates and outlet covers.
Paint
Shiplap has a signature gap between the joints that lets the wall color show through, so paint the wall you'll be working on either the same color of your shiplap or a contrasting color. Paint or stain unfinished shiplap boards before attaching them to your wall.
Measure Wall
Knowing how to install shiplap starts with figuring how much you’ll need. Find the square foot of the wall you’re covering by multiplying the length of the wall by its height. Add 10 percent to your total to account for any waste.
Mark Vertical Studs
When nailing your shiplap boards to the wall, it’s best to attach them to the vertical studs of your wall. Use a stud finder to determine where your wall studs are. Most studs are usually 16 inches or 24 inches apart.
Make a Guideline
Your finished wall will only be as straight as your first row. Using a level, draw a straight horizontal line from one end of the wall to the other. Make sure your guideline is straight by placing your level at different points on the guideline.
Follow Guidelines
Line up the top edge of the bottom row of boards with the horizontal guideline you created in Step 6. Make sure your board either lays on or overalps the vertical chalkline you made to identify the studs in the wall.
Attach First Row of Shiplap
Place a nail through the top and bottom of each shiplap board where it crosses a stud. Use adhesive to glue the board down first or ask a partner to help you hold it in place.
How wide should shiplap be?
It’s up to you to determine how wide you want your shiplap “boards” to be; somewhere between 5” and 6” is pretty common. Using the same width for all your boards will make this job much easier. Tip: A table saw blade is 1/8” wide. If you cut your plywood into 5-7/8” strips, you’ll use the entire sheet without any waste. Set your table saw to the desired width and don’t forget your safety glasses. Large sheets of plywood are dangerous to cut by yourself on a table saw; get a friend to help hold the plywood as you move it through the saw.
What is the best way to use nickels in a board?
Use a nickel as a spacer between every board in a run and between each run.
What to use to cover up holes in a wall?
Use caulk to cover up any unwanted holes.
How to make spacing easier?
Starting at the floor will make spacing your boards easier. Place your first board along the edge of the floor and make sure it’s level.
Can you paint shiplap before cutting?
You normally wouldn't start a project by painting, but in this scenario, it’s much easier to paint your plywood shiplap before cutting it. You’ll only need to paint one side of the wood; allow it to fully dry before cutting. Remember to leave that final sheet of plywood unpainted.
What's Shiplap?
Shiplap boards have grooves cut into their edges for a tight, overlapping fit. Shiplap paneling can add instant character, texture, rusticity and a focal point to any room in your house. It's affordable and easy to install with just a few basic tools — a saw, level, stud finder, hammer and nails.
Measure and Buy Shiplap Materials
Measure your space to determine how many planks you’ll need. Store the planks inside your house for at least 10 days after purchasing them to let the material acclimate to your indoor humidity level.
How to Install Shiplap
Shiplap planks can be fastened to walls either vertically or horizontally. Simply nail through the drywall directly into wall studs. You can use construction adhesive when installing on ceilings or over other surfaces, as long as they're in good condition. Just finish-nail the panels in place to hold them while the adhesive dries.
Coordinating Shiplap With Your Décor
Looking for accent wall ideas? Create a focal point in an entry or living space with shiplap. Play up the rustic look with simple accessories such as a chalky-painted table or repurposed dresser. Learn to apply a DIY Chalk Finish Paint.
See How Your Neighbor Did It
Do you want the shiplap look but for a fraction of the price? Check out how Casey and Bridget of The DIY Playbook got the look for under $100 using plywood.
What Is Shiplap?
Shiplap paneling takes its name from the horizontal planks once used to construct boats. Thanks to the grooves cut into the top and bottom of the boards, builders could fit shiplap panels tightly together to keep out the water. In fact, shiplap boards were so effective that builders began adapting the material for use as exterior sheathing on homes to block cold winds. Until the advent of plywood, shiplap boards were commonly used to construct the sheathing between a home’s structural framing and its exterior siding.
How to cut shiplap boards?
Cutting the Boards: Before installing the plywood boards, you’ll need to “rip” them (cut them parallel to the grain) to the correct width, either using a table saw to do it yourself, or by seeking the help of employees at the hardware store where you purchased the wood. Any width of board can be ripped from a sheet of plywood, but 5-7/8 inches is a safe starting point for shiplap panels. This cut will give you exactly eight 8-foot-long boards from every sheet of plywood (because the saw eats ⅛ inch with every cut).
How to space a board?
Spacing the Boards: Enlist spacers to create uniform gaps (typically 1/8 inch) between each board. You can use any type of spacer you’d like, such as the edge of a carpenter’s square or tile spacers. Make sure that you position each board using the same spacer so the boards appear evenly spaced.
What do you need to know about shiplap?
All You Need to Know About Shiplap. Shiplap can add rustic charm to any blank wall. Learn more about the trendy wooden planks and how you can install them in your own home. Shiplap has been popping up everywhere lately. The rough-sawn wooden planks arranged as horizontal panels can take any wall from drab to dramatic.
What are the materials needed to make a neutral wall?
Other necessary materials include a level, a chalk line, spacers, spackle, and paint to finish the look in a neutral of your choice. Once you’ve equipped yourself with the required tools and materials, installation will follow these seven stages.
What do wood panels add to a home?
The wood panels add visual character and texture to otherwise blank walls in a home, and have the ability to adapt to any decorative scheme, depending on how the homeowner chooses to incorporate the material.
Can shiplap be used as siding?
Nowadays, people often find shiplap sheathing underneath the wood siding of historic homes during exterior renovation projects. The wooden planks, which are highly coveted as reclaimed construction materials, can be carefully salvaged and brought indoors for use as decorative wall coverings. Homeowners looking for an affordable alternative to traditional shiplap may choose to mimic the look by installing long boards ripped from sheets of plywood, leaving slight spaces (the standard gap is 1/8 inch) between each panel.