Tips on How to Decoupage Furniture
- Prep your furniture – from cleaning the furniture piece properly to filling in any holes and fixing simple repairs, prep is very important.
- Remove any knobs or handles – replace them with an updated style, or reuse the ones you have.
- Sand your piece so you have a nice even layer to decoupage.

How to decoupage for beginners?
What do you need to découpage an item?
- Paper. Thin paper is ideal, but you can use almost any type of paper depending on your project. ...
- Glue. PVA glue is a great option for how to découpage. ...
- Brush. To apply découpage paper, you’ll need a slightly different type of brush. ...
- Varnish. To protect your work and seal the surface of the paper, many crafters choose to varnish their items.
What is the best glue for decoupage?
Which Types of Glue Work Best for Decoupage?
- PVA Glue. PVA glue is also known as polyvinyl acetate and is more commonly referred to as wood glue. ...
- Decoupage Glue. As you could probably tell by the name, decoupage glue is specially formulated for use on decoupage projects.
- Spray Glue. Another type of glue that is extremely popular in the crafting scene is spray glue. What is spray glue?
How to make your own decoupage medium?
- Write "Mod Podge" or "Decoupage" on a small piece of paper.
- Cut a piece of clear, packaging tape that is bigger than your label.
- Place the label face down onto the middle of the piece of tape.
- Wrap the packing tape around the glass container. Smooth the tape down to rid the label of any air bubbles.
How to decoupage furniture for an upholstered look?
- White Lightning (wood furniture cleaner)
- Spray Bottle (for White Lightning mixture)
- Baby Wipes
- White Wax
- Wax Brush
- BOSS Clear (stain blocker)
- Decoupage Tissue Paper (Demask 20×30)
- Sawmill Gravy (chalk mineral paint)
- Top Coat – Satin (aka decoupage glue)
- Chip Brush (premium)

What paper do you use to decoupage furniture?
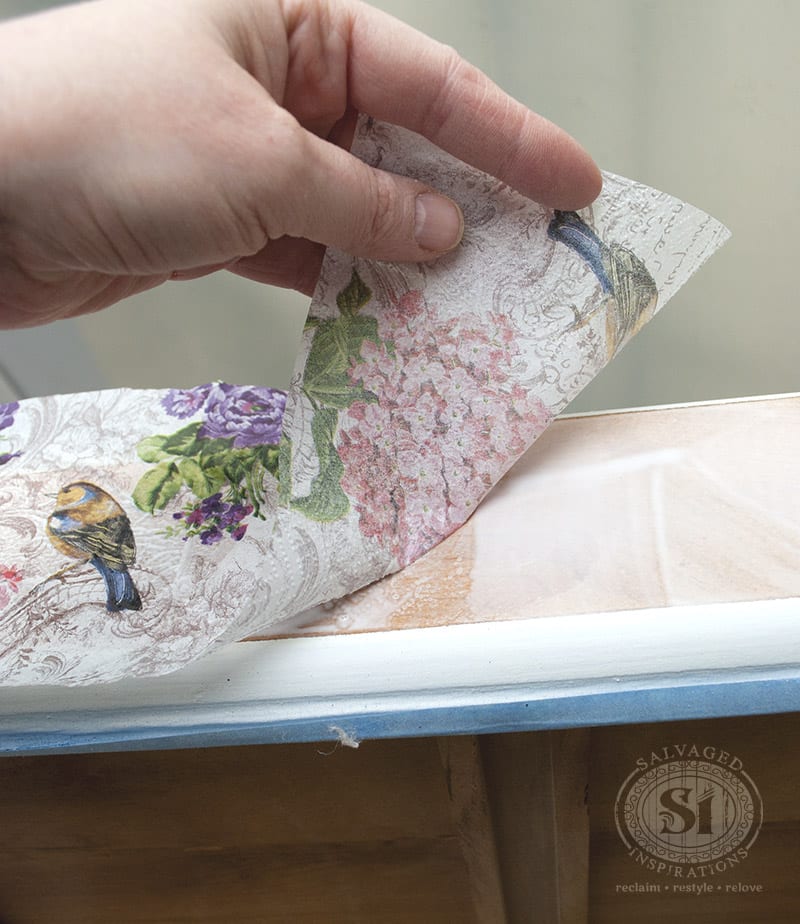
Decoupaging furniture can be done with napkins, tissue paper, or this gorgeous rice decoupage paper that I'm using today – which is the EASIEST way to do it since these papers were made for adding to furniture.
How do you seal decoupage on furniture?
After applying the tissue paper, brush the topcoat over the tissue paper on the decoupage furniture to seal it in place. Apply a small amount of the topcoat to your fingertip then use your finger to smooth any air pockets or tiny lines that have surfaced upon the paper of your decoupage furniture.
How do you do decoupage step by step?
Decoupage: the basic techniquePrepare surface. Once you have selected your item to decorate, make sure the surface of it is clean and dust free as the varnish magnifies any imperfections.Cut out pictures. Select your pictures and cut them out. ... Arrange the pictures. ... Glue the pictures in place. ... Varnish the pictures.
How do you prepare wood for decoupage?
Prepare wood for decoupage. Use light-to-medium grit sandpaper to smooth the wooden surface. ... Cut decoupage material to size. Before or after cutting the napkins, separate the plies to reveal only the top layer. ... Apply Mod Podge and decoupage material. ... Apply additional coats of Mod Podge and optional sealer.
How do you decoupage for beginners?
5:0812:58How to Decoupage / Beginners Tutorial / Step by Step - YouTubeYouTubeStart of suggested clipEnd of suggested clipWhen you apply too much of the decoupage. Glue it will wrinkle up and it'll bubble for you. So youMoreWhen you apply too much of the decoupage. Glue it will wrinkle up and it'll bubble for you. So you just less is more just a real light coat.
Is decoupage the same as Mod Podge?
Mod Podge is one of many available decoupage glues, each with a different consistency and finish. When a fellow crafter tells you that they are making decoupage crafts, feel free to ask them what dazzling spectacle they're looking to make!
Do you have to seal decoupage?
To preserve the job, particularly if you expect the object to get wet, it's wise to seal it using either varnish or polyurethane. Before you do so, gently buff the decoupaged surface with steel wool, then clean it with a damp cloth. Once it has dried, proceed to apply the sealer.
Can you decoupage straight onto wood?
Almost any surface can be used to create a decoupage project. Suitable surfaces include wood, papier mache, terra cotta, tin, cardboard, and glass.
How many layers of Mod Podge do I need for decoupage?
You can use two or more coats depending on the type of affect you are trying to achieve. If you want a soft smooth surface with no ridges, apply at least 5 to 6 coats.
What is the best paper for decoupage on wood?
Cardstock comes in many designs and colors making it a great option for mod podge. A heavier cardstock can be a good option for 3D decoupage. Because it is a heavier option, it will look thicker on your project. Decoupage will work perfectly for adhering your own photos to a project.
Should I varnish over decoupage?
FINISH WITH A VARNISH Anything from four to 15 coats may be needed depending on how thick the decoupage paper is and how smooth and durable a finish is required. To achieve a finely lacquered finish you will need to sand lightly after a few layers of varnish and wipe away all dust.
How do I get a smooth finish on decoupage?
You can get a smooth finish on your Decoupage by either using a sponge brush to carefully apply your Sealant or you can use a very fine Sandpaper and wet sand the surface of your Sealant after it has dried to make the finish extremely smooth.
What is the best sealant for decoupage?
I would recommend either varnish or an enamel sealer for most projects. These sealers can be easily applied, they are quite cheap when compared to other sealers, and they can protect your project from dirs and water.
Does decoupage need to be sealed?
To preserve the job, particularly if you expect the object to get wet, it's wise to seal it using either varnish or polyurethane. Before you do so, gently buff the decoupaged surface with steel wool, then clean it with a damp cloth. Once it has dried, proceed to apply the sealer.
Should I varnish over decoupage?
FINISH WITH A VARNISH Anything from four to 15 coats may be needed depending on how thick the decoupage paper is and how smooth and durable a finish is required. To achieve a finely lacquered finish you will need to sand lightly after a few layers of varnish and wipe away all dust.
How do you seal wood decoupage?
8:2219:07Decoupage Which Top Coat or Varnish - YouTubeYouTubeStart of suggested clipEnd of suggested clipYou want to spray. A light coat first and when it dries go back and spray a very light coat secondMoreYou want to spray. A light coat first and when it dries go back and spray a very light coat second so it's better to build the levels with this and that's all spray paints I used to apply a light coat
Step 1: Prepare Your Surface
If you decide to apply a base coat of paint first, make sure you let it dry for at least 12 hours before decoupaging it. If you’re decoupaging directly over raw wood, all you have to do it make sure it’s clean and smooth! Sand down any rough edges before you continue.
Step 2: Cut Your Material to Size
In this case we’re using pretty floral napkins on the wooden slats of a crate. Make sure you cut your napkins, tissue paper, or fabric to size so it’s ready to apply.
Step 3: Apply Image Transfer Medium
Using a synthetic bristle paint brush, apply one coat of Image Transfer Medium. It doesn’t have to be very thick but you want to make sure you have good coverage. It will start to dry fairly quickly so work in small areas at a time.
Step 4: Lay Your Material Down
As soon as your Image Transfer Medium has been applied, lay your material down while it’s still wet. Use your fingers to gently smooth it out and remove any air bubbles that might be trapped underneath.
Step 5: Distress the Edges
If you’re going for a rustic, aged look you can use a sanding block to distress the edges once your Image Transfer Medium is completely dry. However, if you’re going for a more modern finish, you can skip this step.
Step 6: Seal Your Work
Now that everything is dry, it’s time to seal your work. Apply another coat of Image Transfer Medium, or you can use Tough Coat for this step if you prefer. The Image Transfer Medium will dry clear so don’t worry about dulling the colors.
Step 7: Check Out These Examples
These are just a few examples of the beautiful looks you can create by decoupaging with Image Transfer Medium!
What grit sandpaper should I use for hand sanding?
Keep in mind you are making a bit of an investment with a sander if you don’t already have one, so hand sanding with a sheet of sandpaper or a block works too. I recommend a medium-grit (around 80) to start and then finishing with a finer grit. It does take awhile to hand sand – you will need some patience!
How long does it take to dry furniture before modge podge?
Tape off your piece and paint as normal, with several coats. Then let dry for 24 hours before decoupaging. Now that you’ve learned how to prep furniture – you are ready for Mod Podge!
What to use to remove dust from a sanding board?
Once you’re done sanding, use a tack cloth to remove any dust. Or you can cheat like me and use a wet paper towel . . . :0 However, the tack cloth does work better.
What is primer for furniture?
Primer provides coverage over darker colors and helps paint apply better. I love it for decoupage furniture.
How to fill holes in wood after painting?
Once you sand the paint off, any holes or gashes that you want to fill will be visible. Use a wood filler to do this – one that is stainable/paintable like these. Allow it to dry for the time recommended on the package, then sand and use the tack cloth to remove the dust.
Does modge podge stick to oil?
Hi Vickie! Mod Podge only works with waterbased products. It's not going to stick to oil based product. You'd have to sand it off.
Can you modge podge napkins?
That is when you would sand and prime, and then you could Mod Podge the napkins to the surface all over without any additional painting. It’s just that easy.
Can you use wet paper to smooth edges?
The wet paper will easily tear away and create a clean smooth edge where the paper was applied. After the topcoat has dried, apply a second coat of the topcoat for extra protection. Use the same sanding block to smooth any rough edges after the topcoat is dried.
Can you put tissue paper on topcoat?
Kind of like toilet paper to water… just be ready for it to absorb into the topcoat quickly. After applying the tissue paper, brush the topcoat over the tissue paper on the decoupage furniture to seal it in place.
What is Dixie Belle's new line of embellishments called?
Dixie Belle has a new line of embellishments called Belles and Whistles, and it includes these rice decoupage papers.
What can you use to decoupage?
You can use many things to decoupage, like napkins, tissue paper, posters, etc. But as I mentioned, these days there are tons of papers on the market specifically for decoupaging.
Why do you want to decoupage?
Why would you want to decoupage? It gives your items a unique artistic look that you can’t otherwise achieve unless you are a gifted painter.
Should I paint my bed white before adding paper?
If the bed wasn’t already fairly white, I would have painted the base white before adding the paper. This keeps the paper color as true as possible.
How to clean up glue?
Damp rag : Keep one nearby to wipe up excess glue and to help with other clean up. Make sure the rag is damp and not soaking wet when using it to remove excess decoupage medium from your glued papers. A damp rag also helps to keep your hands clean while working with glue.
What glue do you use for decoupage?
You should have at least one of those in your craft cupboard, but in a pinch, slightly diluted white glue will do.
What to use to smooth out wrinkles?
Bone folder : You can use this to help smooth out wrinkles and remove excess glue. You can also buy a tool made especially for this, called a brayer. Foam brush : Use this to spread the decoupage medium or glue onto the item you will decoupage.
How to glue a picture to a large picture?
Use your finger to gently push down the picture (for a large picture, start from the center and work your way out) and push out any wrinkles and excess medium. You can also use a bone folder or brayer to do this. The Spruce / Rita Shehan. Continue with the last two steps until all of your pictures are glued on.
How to decouple a picture?
To get started with decoupage, you cut out pictures and glue them onto an object. The next step is to cover the object and pictures with a few coats of glue or decoupage medium to protect it. You probably have everything you need to make your project lying around your home right now. Gather your supplies and start crafting .
How to decoupage pictures before glue?
Before you add glue, arrange the pictures onto the item you are decoupaging until you like the way they look. The pictures can be in any placement you like and can also overlap. Working in a small section at a time, remove the pictures and apply a generous layer of decoupage medium onto the item you are decoupaging.
What is decoupage in art?
Decoupage is a craft technique of affixing paper decorations to a hard surface with glue. By looking at a finished project, you would think this craft technique would be complicated, but it isn't. Decoupage started in France in the 17th century as the poor man's alternative to painted furniture. It is actually quite simple.
How to seal a bookcase with clear sealer?
Brush your clear sealer onto your decoupage paper as well as your painted surface to seal and protect the piece. If you are a slightly messy painter like myself, you might want to do what I do and seal the decoupage paper first. Then seal the inside of the bookcase area, and lastly seal the top and sides of the painted bookcase.
How to decoupage a bookcase?
First, you will need to measure the area inside the bookcase where we will apply the decoupage paper. Then lay your paper out on your cutting mat.
What is decoupage paper?
Decoupage paper is a gorgeous and affordable way to add that extra va-va-voom to your painted furniture projects. I feel like I have been a decoupaging everything lately. There are so many options when you want to decoupage on wood with decorative paper, tissue or even wallpaper. This gorgeous green painted bookcase is no exception. The vintage style butterfly decoupage paper really makes the piece itself stand out, don’t you think?
How to apply bondo to a damaged plate?
Mix the bondo on your paper plate and apply to the damaged area .
Can you take paint off a bookcase?
Once the painted bookcase is dry you can take it down off the sawhorse and stand it upright. In the meantime, let’s move the paint from the can to these nifty FIFO bottles. Wise Owl, like many chalk paint lines, come in metal cans, which is fine. But when you pour your paint it can get a little stuck in the rim. I don’t know about you, but this drives me nuts.
Is the first coat of furniture paint good?
The first coat of furniture paint is looking good so far. You can already see how well it works with the decoupage paper, and we haven’t even started that part of the project yet.
Why use a cutting mat?
Using a cutting mat allows you to cut through the paper cleanly without damaging the floor, or a table underneath. It also prevents damage to the cutting blade. This is the mat that I use ( HERE ), I like that it comes with the clear acrylic ruler. Measure and mark your paper.
