
How do you make string art?
Jul 29, 2015 · Start winding your string around your shape and across the shape in a geometric like pattern. You can start over as many times as it takes. Just keep playing with it until you love your little creation. Knot off the end on the last nail to complete your project. Hang your geometric string art in any room of your home.
How can string art help kids learn geometry?
Jan 11, 2017 · Instructions Step One . Lay out the nail holes. Determine the center of the frame or plaque by drawing a diagonal line from corner to... Step Two . If using a frame measure in halfway between the frame edges and opening and draw a square. Step Three . Using your center point mark the center on each ...
Can You DIY a typographic string art DIY?
Jul 09, 2020 · Outline the Shape With String. When the shape has been outlined completely with nails, remove the paper pattern. Using embroidery floss, outline the perimeter of the shape. Begin by tying the floss to the first nail, and leave a tail for tying off when you are finished. Make sure to use all six threads of the embroidery floss.
What colours make string art projects look good?
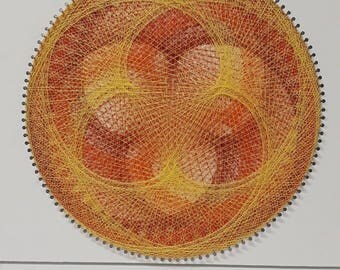
Jan 09, 2015 · A basic string art pattern, the geometric design has a nice three-dimensional effect that looks lovely as winter decor. Free String Art Template. String Art Candle Pattern. You can work this pattern in a single color or combine even more shades of bright orange, red and yellow to turn the pattern into an even more colorful project. ...
How to teach geometry to kids?
Ideas for Exploring Geometry Through String Art 1 Have your child replicate basic geometric shapes in string, like a square, rectangle hexagon, etc. You may use our template for reference. 2 Ask your child to replicate the shapes in order of the number of sides each shape has using the same string. Start with a triangle and move up to an octagon. 3 Explore fractions and the division of shapes. Start with a square and ask your child to divide into equal portions using the string. What shapes are created when they divide it? This is also a great opportunity to show them how fractions work. They can visually see ½ of a square 1/4 etc.
How to measure the circumference of a circle?
Step One Tracing a bowl or cup on one of your frames. Step Two Measure the circumference. You can do this visually by laying a piece of string around the circle, trim it, and then measure the length of string with a ruler. You can also use the formula C = 2 π r Circumference = 2 times π times the radius.
How to make string art?
Once you have outlined the shape with string, begin filling it in by crisscrossing and wrapping from nail to nail. There is no rhyme or reason to this process. Simply go from side to side; top to bottom and corner to corner, varying the lengths and order randomly. If you see that you're about to run out of string, try to end where you left a tail of string at the beginning. Knot the ends tightly and start another bundle of floss there as well. Repeat this process until the shape is filled into your liking, then tie off the end when finished. Clip the tails of thread. Now that you've finished, you can display your creation wherever you want in your home! You can also start a new string art project while you're at it.
When was string art popular?
String art has been around for a while; it was popular in the 70s, but it is enjoying a comeback as a simple and fun way to make your own artwork. This retro craft requires very few materials and is an inexpensive way to add some personality to your walls.
How to make a shape with embroidery floss?
Using embroidery floss, outline the perimeter of the shape. Begin by tying the floss to the first nail, and leave a tail for tying off when you are finished. Make sure to use all six threads of the embroidery floss. Using fewer will cause the strings to break when you pull it taut against the nails.
Who is Valerie Ott?
Valerie Ott is a lifestyle writer who has years of experience writing on home decor, accessories, and DIY projects. String art has been around for a while; it was popular in the 70s, but it is enjoying a comeback as a simple and fun way to make your own artwork. This retro craft requires very few materials and is an inexpensive way ...
How to make string art?
To make string art, first draw a design you want to create out of string on a piece of paper. Then, cut the design out with scissors. Tape the design to a piece of soft wood. Next, gently nail veneer pins into the wood around the edges of the paper so they're evenly spaced.
Who is Nicole Bolin?
Nicole Bolin is a Crafting Specialist and the CEO of Stencil, a DIY Craft Studio in Phoenix, Arizona. Nicole specializes in interior design and various craft and DIY projects.
What color is the Eiffel Tower?
Eiffel Tower, a landmark that has made its way into all sorts of art and craft projects, looks extra special when worked with nails and strings. The pink and black combination really makes the pattern work.
What is the best medium to express your faith and beliefs in one or two words?
Typographic crafts have always been popular, as people love to have wall decors and showpieces featuring motivational words and phrases. String art is the perfect medium to express your faith and beliefs in one (or two) word.
3. After all of the nails are in place, gently pull off the paper for a nice outline
You'll then have a nice outline / pattern for your string art project. Keep in mind that nail and string art can be made with just about any design. Make it personal to you!
5. Cut off loose strings
After finishing each of your colors, be sure to cut off any loose ends of the strings.
Copyright
All images and text on this site are property of Love Our Real Life. Feel free to use one or two photos provided that a link back to my original post is included. Please do not remove any watermarks or edit any of my images without first obtaining written permission from me. All free printables offered are for personal use only. Thank you!
