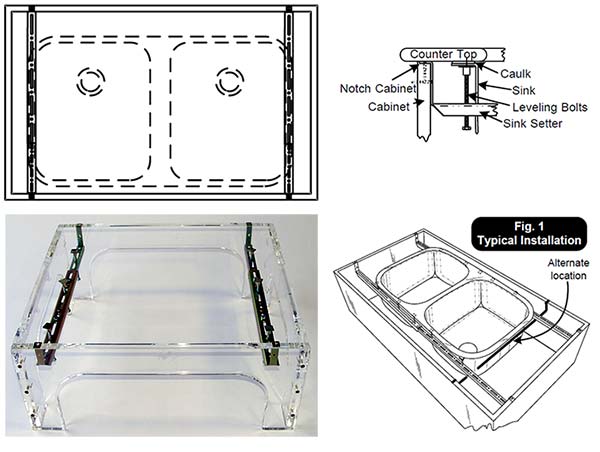
Here's a typical installation procedure:
- Turn the sink over and note the groove on the underside of the rim. ...
- Apply silicone caulk to the underside of the rim, drop in the sink and turn the clips 180 degrees to be underneath the countertop.
- Insert the screw into the clips, if they're not there already, and tighten each screw with a screwdriver to hold the sink securely. ...

How do you install a stainless steel sink?
- Lay a continuous bead of pure silicone caulk around the perimeter of the hole in the countertop. ...
- Drop the sink into place and push down along the rim to embed sink in the caulk.
- Install the clips to hold the sink as per the manufacturer's instructions and tighten them with a screwdriver. ...
- Lay another bead of caulk along the edge of the rim to seal it.
How to cut into your stainless steel sink?
Step By Step Process Of Cutting A Hole With Required Tools
- Drill
- Lubricant – Some 3 in 1 oil or similar
- Hammer
- A “brand new standard size 3/8” Bi-Metal hole cutter (Some Faucets require a 1 ½ hole)
- A small wooden block (optional)
- Center Punch or Nail
- A Marker (sharpie or similar)
- An old rag
- Safety Glasses
- Measuring Tape
What are the best stainless steel sinks?
- BEST OVERALL: Kraus Kore Workstation 30-Inch Stainless Steel Sink
- BEST BANG FOR THE BUCK: Ruvati 30-Inch Undermount Stainless Steel Sink
- BEST TOP-MOUNT: Friho 28″x 22″ Drop-in Stainless Steel Sink
- BEST UNDERMOUNT: Kraus Kore 2-Tier Undermount Stainless Steel Sink
- BEST APRON/FARMHOUSE: Sarlai 33 Inch Farmhouse Kitchen Sink
How to insulate a stainless steel sink?
- The first thing you should be doing is to clean the working area. This involves cleaning the under-sink cabinet. ...
- Make yourself safe during the process. ...
- It is up to you where you want to start. ...
- If you have a double sink, spray the channel between the bowl and its outer side. ...
- After the previous steps are done, let the insulation cures for an hour or two. ...

How do you install sink mounting clips?
2:223:58How to Attach Sink Clips : Home Sweet Home Repair - YouTubeYouTubeStart of suggested clipEnd of suggested clipPosition. There's no interference with anything. So once the clips are positioned. And they're fullyMorePosition. There's no interference with anything. So once the clips are positioned. And they're fully installed around the whole perimeter.
How do under mount sink clips work?
1:283:17How To Install EZ Undermount Sink Clips & Strength Test! - YouTubeYouTubeStart of suggested clipEnd of suggested clipSqueeze a generous amount of adhesive. Within your markings for the mounting. Stud. Then place theMoreSqueeze a generous amount of adhesive. Within your markings for the mounting. Stud. Then place the stud onto the wet adhesive to force it through the channels in the plate.
What are the different types of sink clips?
There are two types of kitchen sink clips: attached directly to the decorative rim or attached directly to the sink. Clips that attach to the decorative rim are usually used for overmount sinks, and clips that attach to the sink are usually used for undermount sinks.
How do you install an undermount sink with clips?
0:071:45How To Install an Undermount Sink - YouTubeYouTubeStart of suggested clipEnd of suggested clipCarefully place the sink upside down on the countertop positioning. It within the outline. AttachMoreCarefully place the sink upside down on the countertop positioning. It within the outline. Attach the sink clips and wing bolts and tighten snugly. Carefully lift and place the counter on the sink.
Do you need clips for undermount sink?
Most undermount sinks come with clips to attach them to the underside of your countertop. However, you don't have to use clips for all undermount kitchen or bathroom sink installations. You can also use brackets or the two-part epoxy. You can also use a combination of attachment methods for a more secure hold.
What holds an undermount sink in place?
Undermount sinks are typically attached with a two-part epoxy adhesive and sealed with silicone caulking around the perimeter.
What are sink clips for?
About this item. PERFECTLY SECURE YOUR SINK: Sink clips provide stability to anchor any undermount sink in place! Use On Undermount Kitchen Sinks & Undermount Bathroom Sinks.
How do you secure a sink without a clip?
Traditionally, kitchen sinks use mounting hardware to secure the sink to the countertop. However, when you are missing the hardware, or your installer recommends that you avoid drilling the required hardware mounting holes in your granite, you can use silicone adhesive and epoxy to install the sink.
How do you tighten a sink clip?
Rotate the arms of the clips so they are under the countertop, then tighten the screws in a crisscross pattern. You may need a long screwdriver or an extension bit to access the screws if you are installing a deep sink.
Do you need sink clips?
Sinks come in three different styles, and most, but not all, of them require sink clips to hold them to the countertop. The clips are most crucial for undermount sinks because they're the only things preventing the sink from falling.
How do you secure an undermount sink to granite?
4:305:41How To Install An Undermount Sink To A Granite Countertop - YouTubeYouTubeStart of suggested clipEnd of suggested clipSome blue painters tape your hercules universal sink harness. And a drill with a 7/16 bit someMoreSome blue painters tape your hercules universal sink harness. And a drill with a 7/16 bit some silicone and some rags. And again like I said I mean once you've got everything taped.
How many sink clips do I need?
Clips are designed to keep the sink from shifting, but in conjunction with caulk, glue or sealant to keep it in place. Most sinks use about 10 clips around the edge. Brackets are similar to clips, but much larger.
How do you secure a kitchen sink with clips?
Apply silicone caulk to the underside of the rim, drop in the sink and turn the clips 180 degrees to be underneath the countertop. Insert the screw into the clips, if they're not there already, and tighten each screw with a screwdriver to hold the sink securely. Don't overtighten.
How do you secure an undermount sink?
1:203:26How To Replace and Install an Undermount Sink - YouTubeYouTubeStart of suggested clipEnd of suggested clipThere are several types of brackets for undermount sinks ours are attached to the countertop withMoreThere are several types of brackets for undermount sinks ours are attached to the countertop with epoxy. Others use a mounting system that anchor into the countertop.
How many clips are needed for undermount sink?
Most undermount kitchen sinks require 10 sink brackets to provide adequate sink support, which is the number included in our set.
Do all drop in sinks have clips?
The sink basin drops straight into the countertop cut-out, and the perimeter lip holds everything in place. Drop-in sinks are secured by hidden metal clips under the countertop as well as a bead of silicone caulk under the sink's edge. Yet not all drop-in sinks require clips to lock them down.
How do you install undermount sink clips?
1. Remove the sink 2. Mark position of clips 3. Attach clips 4. Position sink 5. Clip sink to counter
Are sink clips necessary?
Sink clips are necessary in almost all situations with the exception of a cast iron sink with overmount installation.
What are the different types of sink clips?
There are two types of sink clips: ones that attach to the rim and ones that attach to the sink itself.
What You Need To Know About Installing Kitchen Sink Clips
There are two main types of kitchen sink installation: undermount and overmount.
How To Install Kitchen Sink Clips (5 Steps)
Now, you need to learn the steps involved in installing kitchen sink clips. Follow these 5 steps to do the job yourself without the help of a plumber.
Final Thoughts on How to Install Kitchen Sink Clips
You need to attach your sink to your countertop properly. You can do that with kitchen sink clips that fit on the bottom of the sink bowl. You need kitchen sink clips for most sinks. However, it all depends on both the sink and the type of countertop.
How to tighten a sink drain gasket?from thisoldhouse.com
Fit the gasket onto the sink-drain tailpiece and attach it to the strainer with its slip nut. Tighten the nut by hand while holding strainer.
What is the best way to seal a sink and drain basket?from bobvila.com
Many people use plumber’s putty instead to seal the connections between the drain basket and sink and the sink and countertop. Plumber’s putty dries out over time, allowing water to leak between these seams and cause damage. Use caulk, which won’t dry out.
What are some common mistakes when installing a kitchen sink?from bobvila.com
Two common mistakes with a kitchen sink install are forgetting to clean the new sink thoroughly before installing and forgetting to install the new faucet before installing the new sink.
How to connect schedule 40 PVC pipe?from bobvila.com
Cut the piece of schedule 40 PVC pipe so that the tailpiece lines up with the drain pipe. Attach the pipe to the tailpiece. Connect the P trap to the tailpiece and the drain pipe. Once all the connections are made, tighten each nut with locking pliers.
What seals the sink to the countertop?from hunker.com
A bead of silicone caulk seal s the sink to the countertop.
How long does it take to install a new sink?from bobvila.com
While many people call a plumber to complete the installation of a new sink, installing a sink can be completed in a couple of hours with just a few basic tools and supplies, saving you hundreds of dollars. Put your checkbook away, strap on a tool belt and knock out this sink installation on your own with our guide detailing how to change a kitchen sink.
How to trace a sink outline?from hunker.com
No template? Find a piece of cardboard large enough to cover the sink and draw an outline of the sink on the cardboard. Measure the width of the rim and draw another outline inside the original, in set by a distance equal to that width. Cut out the inner outline and use this cutout portion as a template to trace the sink outline on the countertop.