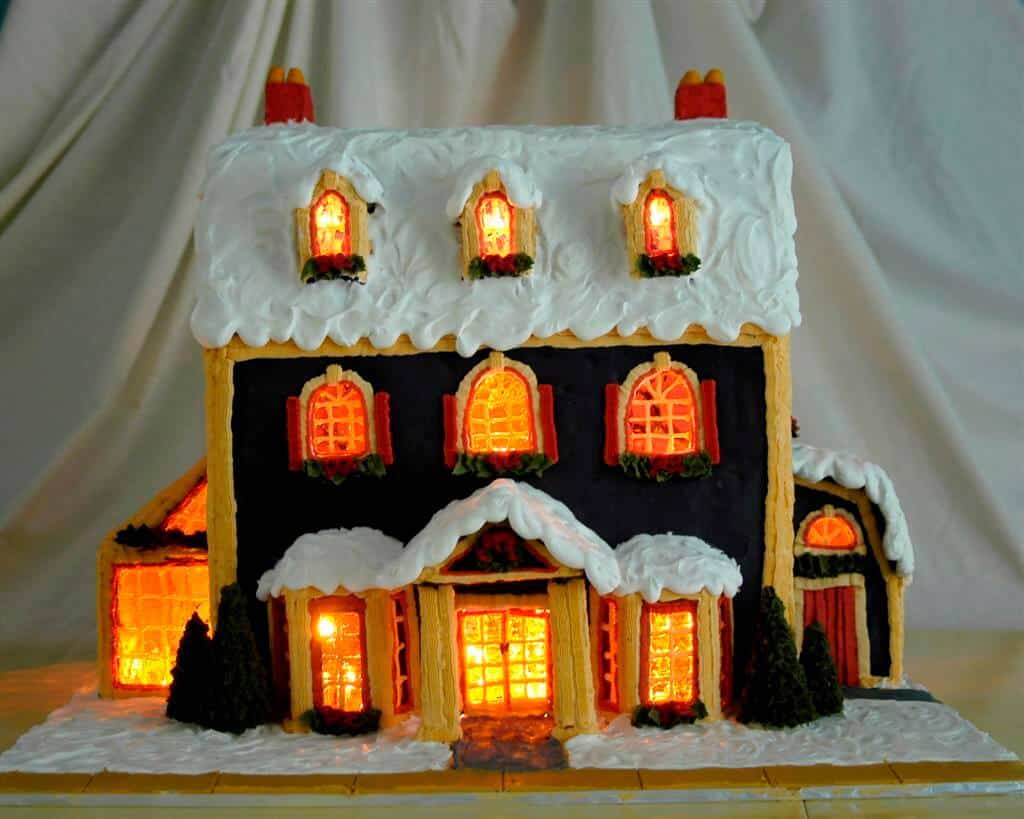
How do you light a gingerbread house? The easiest way to add lighting to your gingerbread house to use 2-3 yellow LED Tea Lights if you have a smaller house. For larger houses it is not adequate, so it is better to use short string of lights (at about 10 lights).
How do you burn sugar for a gingerbread house?
InstructionsPlace sugar in a bottom heavy saute pan over medium to medium-high heat.Swirl it around while the sugar starts to melt.Continue stirring until all the sugar and any clumps fully melt.Turn the heat to low (on a gas cook top) or turn off (on an electric cook top) to keep the sugar from burning once melted.More items...•
How long should you let your newly constructed gingerbread house dry before decorating?
Here's my completely homemade gingerbread house recipe including how to bake, construct, and decorate with royal icing and buttercream. Everything can be prepared in advance, see my make ahead tip after the recipe instructions. House structure must completely set for at least 4-6 hours before decorating.
How long can you keep a gingerbread house on display?
Generally, Gingerbread can last up to 12 months with proper storage. Based on the type of gingerbread, there are different expiration dates.
How do I make my house look like a gingerbread house with lights?
0:332:56Day 1 - We turned our home into a GIANT gingerbread house! - YouTubeYouTubeStart of suggested clipEnd of suggested clipPeople on them as well two smaller versions. And gingerbread cookies. And then pulling in the colorsMorePeople on them as well two smaller versions. And gingerbread cookies. And then pulling in the colors of the buckets in the lights.
Should you decorate your gingerbread house before putting it together?
We suggest decorating the walls before assembling the house. Place royal icing into pastry bag with a writing tip. With your house pieces on a flat surface, pipe on windows and doors.
Why does my gingerbread house fall apart?
“Most gingerbread disasters, collapses, and frustrations happen because the icing hasn't had an adequate amount of time to dry. It's not always easy for kids to be patient, so it's a good idea to have some other activity lined up in between steps to distract kids while they're waiting to work on the house.”
Do you need to cover a gingerbread house?
Storing Houses If you want to keep a gingerbread house looking perfect throughout the holiday season, display it in a cool, dry place. Covering it at night with plastic wrap seals out moisture, dust, bugs, and other errant inedibles.
How long after making a gingerbread house can you eat it?
Is my gingerbread house edible? Wilton gingerbread house kits are edible; however, we suggest keeping it in a cool, dry place and keeping it covered with plastic wrap at night to prevent dust from settling on your house. Your gingerbread house is edible for up to 5 days after decorating.
Do you refrigerate gingerbread house?
You can help keep freshly baked gingerbread cake fresh a little longer by storing it in the fridge, but it is not recommended because it dries out much faster there. Gingerbread cookies and gingerbread houses should be stored in a tightly closed container on the counter or in the pantry.
How do you decorate a gingerbread house like a pro?
2:546:20How to Decorate a Gingerbread House | Tutorial by Rosanna PansinoYouTubeStart of suggested clipEnd of suggested clipThen put a little dab of icing. And add a second layer of triangles. I also made a bow using a redMoreThen put a little dab of icing. And add a second layer of triangles. I also made a bow using a red rolled out gumdrop. Once again using our icing we're gonna stick it on our gingerbread.
How can I decorate my house like a gingerbread house?
0:082:35DIY Christmas decorating ideas Gingerbread house candyland themeYouTubeStart of suggested clipEnd of suggested clipHouse. I took a four foot by 8 foot piece of styrofoam insulation board and cut some scalloped edgesMoreHouse. I took a four foot by 8 foot piece of styrofoam insulation board and cut some scalloped edges out of it I then sanded on it just to give it a little bit cleaner more three-dimensional. Look.
How do I make my house look like Christmas?
Celebrate Christmas In Style: 16 Ways To Make Your Home Feel...How To Make Your Home Extra Christmassy.Make It Smell Nice With Scented Candles.Get Creative With Artificial Snow.Light Up Your Home with Fairy Lights.Crack The Drinks Open & Be Merry.Decorate Your Door with a Festive Wreath.Indulge Your Sweet Tooth.More items...•
How long does it take for gingerbread house to dry?
Wilton suggests letting your gingerbread house dry for an hour in between putting up the walls and roof, and another 2-3 hours before decorating.
How long does it take for a gingerbread house to harden?
DO allow the baked gingerbread pieces to sit and completely dry and harden for AT LEAST 5 days. DON'T wrap the baked pieces OR freeze them. They need to air dry completely!
What do you do with a gingerbread house after you make it?
Clever cookie: 7 delicious ways to use leftover gingerbread...Leftover Gingerbread House Truffles. ... Gingerbread Ice Cream. ... Gingerbread House Milkshakes. ... Gingerbread House Pie Crust. ... Gingerbread House Ice Cream. ... Gingerbread Bark. ... Gingerbread Ice-Cream Cake.
How do you keep a gingerbread house fresh?
If you want to keep a gingerbread house looking perfect throughout the holiday season, display it in a cool, dry place. Covering it at night with plastic wrap seals out moisture, dust, bugs, and other errant inedibles.
How to save a gingerbread house
To successfully save a gingerbread house after the holiday season, it’s important to completely coat the house with a sealer that will keep out any moisture and dust.
Step 1: Dry the house out
To dry out a gingerbread house, you can place it in a dry environment with low humidity for a few days in order to draw out any moisture from the surface and from the candy decorations.
2. Sealing the gingerbread house
To seal the gingerbread house after thoroughly drying it, start by spraying it with a non-water-based sealer, making sure to spray the inside and the outside, as well as all exposed edges. It’s important to cover all of the surfaces to prevent any areas where air could get into the gingerbread.
3. How to store the preserved gingerbread house
After sealing the gingerbread house, it’s important to make sure that the house is stored in an appropriate dry, room temperature environment. If the preserved house is stored in a high-heat or high-humidity environment, the house might be affected if the sealing step wasn’t done thoroughly enough.
Should you bother saving a gingerbread house?
Saving a gingerbread house is something that can be done, but it takes a lot of effort to do it correctly, and there’s no guarantee that mold won’t develop inside the house anyway if there’s any kind of crack in the sealer.
About Us
I'm a former cake decorator and award-winning gingerbread house maker who has always loved miniatures. I decided to make this website for fun, and I'll be learning as I go!
LEGAL INFORMATION
This site is a participant in the Amazon Services LLC Associates Program, an affiliate advertising program designed to provide a means for sites to earn advertising fees by advertising and linking to Amazon.com. We are compensated for referring traffic and business to Amazon and other companies linked to on this site.
Step 1: LED Wiring
If you are like me and are making your own LED wires, this step is for you! If you can take the advice from the next step, lucky you, you can skip the tedium! Still with me? You will need a fair amount of wire here, and it is very helpful if you can get pairs of wires that are connected. I was given a big roll of ribbon cable, which made this task a lot easier. After cutting a length of cable, I simply split it into groups of two wire. So with wire and LEDs handy, lets get started. Clip the leads of the LEDs so they are short, but still long enough to solder to. Hold onto the clipped legs, they can be useful later on. Put the clipped LED in a pair of helping hands to hold it still. Strip the wires and put it in the other clip of the helping hand. It helps to tin both the wire and LED legs before soldering them together. Line up the wire with the LED and solder the wires to the legs. It might be a good idea here to stick to a colour scheme if you can (red for anode, black for cathode), but I had a lot of different colours, so I didn't bother. It is easy to determine which is which later, but you might make your life easier if you can do it. For the other end of the wire, I originally left it bare (but tinned). After using it like that, I realised I needed a better option. As I connected all of the wires through a breadboard, I found it easiest to solder breakaway headers to the other end of the wire. Just like the LEDs, tin both, use helping hands and solder them together..
Step 2: Threading LEDs
We need to put LEDs inside the ginger bread house, but also have them connected to a micro controller to allow light sequences. This can be achieved by soldering the LEDs onto long wires, and then threading them through the house. We started the house late this year, so I had to make the LEDs on wire myself, but if you have time to spare, you can buy them pre made: http://www.aliexpress.com/product-fm/504804787-20-x-Red-LED-Lamp-Light-Set-25cm-Pre-Wired-5mm-12V-DC-wholesalers.html If you are making them yourself I would suggest you use some heat-shrink tubing over the LED leads, I simply ran out of time to buy some. Either way, you need to thread the LEDs wire first through the gingerbread. We found it helpful to make a guide hole using a toothpick..
Step 3: LEDs in the Roof and Tree
Now that you have soldered all of your LEDs up, you need to install them in the house. I put all of the 5mm LEDs in the roof, and then some 3mm LEDs in the tree. For the house I had to cut a small exit hole in the back. The tree is just an ice cream cone covered in fondant. With wires of different colours all bundled together, I needed to work out the polarity of the wires and which wire mapped to which LED. To do this I set up a small power supply (plug pack & 5v regulator), and tested wired pairs to determine which LED and in which direction to connect the wires. I did discover here that some LEDs didn't work, likely due to poor solder joints. At this point though it would have been too hard to fix them, so I simply accepted some "dead pixels"!.
Step 4: Charlieplexing the LEDs
My house & tree has 41 LEDs in total. To power them all I used a technique called "Charlieplexing". This is a neat trick which uses the fact that LEDs are diodes (current only flows one way) and that micro controllers can have 3 states on their pins (High, Low and High-impedance / disconnected). Putting it all together, charlieplexing allows us to access n* (n-1) less (where "n" is the number of micro controller pins you are using). I needed 41, and the closest combination was 42 from 7 pins: 7* (7-1) = 42 If you want to understand the concept in depth, this instructable is where you should start: https://www.instructables.com/id/Charlieplexing-LEDs--The-theory/ I drew up a schematic in Fritzing for how all of the LED connection combinations. I then wrote down all the wiring combinations so I could track what I was doing. To connect all of the LEDs into this charlieplexed matrix, I decided to use a breadboard. This kept everything flexible and reusable for future projects. As I said earlier, I did not use a consistent colour scheme to mark the anode and cathode of the LEDs, so as a result I had to test them before use. To achieve this I put together a small breadboard with 5v regulator, a current limiting resistor and an LED to show it was powered. From here I just had to plug the LED (wires) being tested into the breadboard to figure out which LED it was, and which wire was the anode / cathode. I'll cover how they were all connected in a breadboard in the next step.
Step 5: The Messy Breadboard
The breadboard proved to be a very flexible way to connect all of the LEDs, but it also proved messy! It took a few tries to get a layout that worked, but this is what I came up with. I started by splitting some ribbon cable into sets of 7 wires. I tinned all of the ends and plugged it into the board to extend the number of slots I had for each pin. I also used wire to bridge the two sides of the breadboard, to give me even more space. Originally I had resistors in place for current limiting, but due to the way charlieplexing scans, I was able to get away without them and I got slightly brighter LEDs (a smaller display will likely need them still). Using the schematic from the previous step, I wrote down all of the combinations and crossed them off as I made the connection. I changed my mind a few times in how I was connecting things up, which is why I seem to have 3 different marks for "done"! With everything plugged in, I connected the Arduino to the board, and started work on the code..
Step 6: The Code
Before you look at the code, I have to say that I had grand plans, but ran out of time.
