- Use a circular saw to cut four balusters into 12” length pieces and another four balusters into 18” length pieces.
- Sand down the rough edges of the balusters.
- Build the form for the concrete table, using the melamine as the base and the 2x2s or 2x4s as braces.
- Seal the form with latex or silicone caulk. Once the caulking is dry, wipe the form to remove dust and dirt, before pouring in the concrete.
- Mix the QUIKRETE® Countertop Mix , according to packaging instructions, and pour it into the form.
- Pack the concrete so that it reaches every corner, and vibrate the form with a hammer.
- Let the concrete cure for at least 48 hours before removing the form. TIP: While the concrete is curing, cover it with a plastic sheet.
- Remove the form and scrape off any residual caulk.
- Use the balusters to build the table base. TIP: drill pilot holes before screwing, to prevent the balusters from splitting.
- Place the concrete slab on top of the base.

Is this a good DIY concrete coffee table?
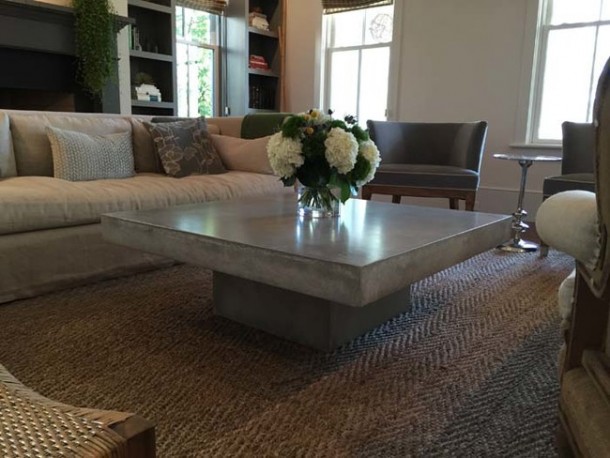
This is an excellent DIY concrete project for beginners and the more experienced alike. This concrete coffee table will make a bold statement, and look great. The concrete portion will take a bit more time, but will give you a beautiful top that will last for years.
How do you attach a concrete base to a wood table?
Run a bead of silicon around the top of the wood base. Then center and place the concrete top on the base. The concrete is heavy and won't budge much, but the silicon will make sure to keep it in place. Be sure to have a couple of friends help you move this around, it’s going to be heavy!
Can you build a side table out of concrete?
Even your concrete side table can have a luxurious, ombre effect. Just take a cue from BHG and finish the style of your DIY concrete table. 8. Traditional Addition This more traditionally-styled table was built with the help of pine boards by Rogue Engineer.
Why are people going crazy for concrete coffee tables?
People are going crazy for concrete coffee tables, and it’s easy to understand why. With concrete's ability to be molded into any shape and assume any texture or color, it works beautifully with styles ranging from traditional to urban-chic.

How do you make a homemade concrete table?
2:567:01How to Make a Lightweight Concrete Table - YouTubeYouTubeStart of suggested clipEnd of suggested clipAnd then mixed in a single 50 pound bag i then split the mix into two buckets. So they could add aMoreAnd then mixed in a single 50 pound bag i then split the mix into two buckets. So they could add a little bit of a lime strong pigment to one of the buckets. I'm using a slate gray.
What kind of concrete do you use for a table top?
Mix portland cement (not normal concrete mix) with water until it is a toothpaste consistency. You could mix the cement with a concrete fortifier to help it bond as well, but is not necessary. Rub the paste into the bugholes using a circular motion. Fill any other areas with the paste as needed.
How thick does a concrete table top need to be?
1 1/2”HOW THICK ARE CONCRETE COUNTER- TOPS? Standard thickness is 1 1/2” with a minimum of 1 1/4” and maximum of 3”. Any thickness beyond 3” can be achieved using techniques to give the appear- ance of the desired thickness, yet still maintain weight and size within desirable limits.
How many bags of concrete do I need for a table top?
1 to 2 bags of concrete (depending on size of table) – I use a mix available at stores like Home Depot or Lowes ($5/bag) SAKRETE or QUIKRETE 5000 work great. Portland cement – You may have to buy a full bag for $10.00. It will last for a long time as you only need a pint or so per table.
How do I make a concrete table top?
0:3913:12How To Make a Concrete Coffee Table and How to Embed a Metal ...YouTubeStart of suggested clipEnd of suggested clipForward slash concrete table with inlay. Then begin attaching the sidewalls to the base piece on aMoreForward slash concrete table with inlay. Then begin attaching the sidewalls to the base piece on a flattened. Level surface always pre-drilled to prevent the wood from splitting.
How do I make an outdoor concrete dining table?
0:1617:45Building a DIY GFRC CONCRETE Dining Table for Outdoors // How ToYouTubeStart of suggested clipEnd of suggested clipThe first step in the project was to build a form for the concrete. And melamine is really theMoreThe first step in the project was to build a form for the concrete. And melamine is really the perfect choice here as its smooth surface doesn't stick to concrete.
How do you cover a table in concrete?
0:0957:24How To Make A Wood Table Look Like A Concrete Top Using An Easy ...YouTubeStart of suggested clipEnd of suggested clipAnd now we're gonna bondo the edges all the screw holes and they're going to show you how to turn itMoreAnd now we're gonna bondo the edges all the screw holes and they're going to show you how to turn it into a slab of concrete it's going to be a really cool. Video. So what I got here I got the bondo.
How do you make a concrete countertop?
5:0723:18How to Make Concrete Countertops - YouTubeYouTubeStart of suggested clipEnd of suggested clipYou can cut it to length with a cut-off blade on an angle grinder. Once it's cut I attach the rebarMoreYou can cut it to length with a cut-off blade on an angle grinder. Once it's cut I attach the rebar to the existing wire mesh using zip ties.
How to strengthen a concrete table?
Attach the two upper supports in the middle. These help strengthen the table and allow the weight of the concrete to distribute more evenly.
How to make a concrete form?
Pour Concrete into the Form. Mix the concrete (1 or 2 bags at a time) and get it to a consistency that is peanut-butter-like. Next, we’ll add it to the form. Wear gloves for this process, spread the concrete evenly in the form and fill it a little more than ¾ of an inch full.
How to make a mold out of foam?
Cut the foam to size. The foam will stay in place while filling the mold with concrete by securing the foam. Cut 3 scrap boards to 37 ½ inches in length and approximately 3 inches wide. Space them evenly and attach them to the foam using silicon or wood glue. Let the glue cure completely.
How do I seal a concrete top?
Let this dry and cure before sanding it down again. After the final sanding, I like to use a blue scotch pad and a little water to help clean the concrete prior to sealing. Then we’ll add our sealer! I used a 100% food safe, high quality sealer made by Cheng Concrete Products for this. Grab your desired sealer, dilute it down with water and apply nice, smooth, even coats making the water to sealer mixture stronger (less diluted) as you go. You can apply as many coats as you’d like, I did about six coats with the final coat being nearly 100% sealer. Let this cure and dry for the manufacturers recommended time. I use Cheng Concrete Sealer and Cheng Concrete wax .
How thick is a knockout concrete top?
A foam knockout allows you to create a very thick looking concrete top with a fraction of the weight and cost. We’ll have a 1 ¼ inch wide apron that is 3 inches thick and runs around the perimeter of the piece. Cut the foam to size.
How to keep concrete from shifting?
I’d recommend running a bead of silicon around the top of the wood prior to putting the concrete top in place. This will prevent the concrete from shifting. Then find a friend to help lift the concrete onto it’s base. Center it as best as possible. There will be a channel between the concrete and the wood — where you can run optional LED lights if you’d like.
How to seal melamine molds?
The best and easiest way to do so is by adding a clean bead of 100% silicone to the edges. Follow through with a beveled edge tool and make sure there is not an excess of silicone on the mold.
I wipe out the form and cut some wire mesh for reinforcement and then caulk all the corners and clean them up with a caulking tool
I wipe out the form and cut some wire mesh for reinforcement and then caulk all the corners and clean them up with a caulking tool.
I then add the wire mesh and finish filling the mold i screed it flat on the bottom and let it dry for about five days
I then add the wire mesh and finish filling the mold i screed it flat on the bottom and let it dry for about five days.
I countersink and screw these one in properly this time with no Brad nails
I countersink and screw these one in properly this time with no Brad nails.
I then use some paste wax which is a trick I learned from my cat mud dust real maker and then I apply the caulk.The wax helps release the caulk after I use this cool little fondant cool
I then use some paste wax which is a trick I learned from my cat mud dust real maker and then I apply the caulk.The wax helps release the caulk after I use this cool little fondant cool.
I then mix up some Portland cement and some fine sand this time in order to use a copper sprayer
I then mix up some Portland cement and some fine sand this time in order to use a copper sprayer.
Step 1: Build a Form
We used Melamine for the form. The thin sheet on the bottom seemed like a better bet than a 3/4" piece simply due to the cost. We had a heavy board underneath it so it wouldn't be able to flex. The edges are 3/4" melamine.
Step 2: Give It Some Legs!
While the dap dried, we put the legs together. We used 3/4" pipe for the vertical supports but reduced down to 1/2" for the horizontals. This saved us a bit of cash.
Step 3: Call in the Reinforcements!
Again, in an effort to reduce weight, we opted to exclude re-bar or any other reinforcing metal. We went with poly fibres instead. A friend who works for a concrete company gave them to me. I didn't do any testing to see if it was stronger, but it hasn't crumbled yet. 3 months and counting!
Step 4: Pour It
Sorry, a bit of a jump ahead here we mixed and poured the concrete. My mix was a bit dry but it seemed to go in nicely. We followed the instructions on the bag but could have used more water. Pour 1/2" of concrete into the form, lay in the insulation, fill in the rest.
Step 5: Attaching the Legs
This is how the legs are attached to the table. I just used threaded rod and not bolts (as drawn). After we poured the concrete, we placed the legs on the wet concrete and pushed the rods in. They probably aren't gripping as well as we'd like, but they didn't really move after everything was dry, so we called it good.
Step 7: Oooooo, Ahhhhh. Unboxed
We unwrapped it after an impatient 7 day cure. It came out of the form pretty well, but peeled a pit of the melamine paper off, which stuck to the table top. Hand sanding and a flap wheel attachment on my drill made quick work of that.
Step 8: WE LANDED ON THE MOON!
We didn't get an absolutely flawless finish on the table top, but really, we didn't want it to be perfectly smooth. The pits and air bubble holes add texture and depth. We could have smoothed it out more by vibrating the concrete and having a wetter mix.
Can Legos be used as side tables?
Did you know that Legos can be your best friend when creating side tables, at least ones made from concrete. Check out this video from HomeMade Modern to see how!
Can you make a concrete side table ombre?
Even your concrete side table can have a luxurious, ombre effect. Just take a cue from BHG and finish the style of your DIY concrete table.
HOW MUCH DO CONCRETE COFFEE TABLES COST?
A concrete coffee table can range anywhere from under $100 to over $1,000 depending on the size and design complexity. Although custom-made pieces will usually cost more because of the labor involved, they are often more economical than tables made from high-quality woods and natural stone because the raw material costs are relatively inexpensive, especially if recycled materials are used. Plus, you’ll be investing in a one-of-a-kind piece that will last for decades.
ARE CONCRETE COFFEE TABLES HEAVY?
While it's true that coffee tables made from traditional normal-weight concrete can be pretty hefty, many fabricators reduce the weight by making them with glass-fiber-reinforced concrete (GFRC), which is not only much lighter than standard concrete (by as much as 75%) but also more crack-resistant. Concrete furniture makers may also use lightweight cores or special reinforcement methods to keep the weight down, especially for larger pieces.