How to Build a French Cleat Shelf
- Bevel-Cut the Mounting Cleat photovsGetty Images Next, bevel-cut the edge of the mounting cleat to 45 degrees using a table saw, circular saw or jigsaw. ...
- Cut the Tool-Shelf Cleat . ...
- Build the Tool Shelf . ...
- Secure the Mounting Cleat . ...
- Hang the Tool Shelf . ...
- Check the Cleat for Strength . ...
- Start Using Your Cleats . ...
- Add Side Supports . ...
Full Answer
Step 1: Cut to Size
I started by cutting down some pre-primed pine I bought at Home Depot. I chose both 6 and 8-inch 3/4 stock. The pictures only shows me making some 8-inch boxes, but the steps apply to any size you wish to make. I made 12 x 12 and 18 x 24 inch boxes that you’ll see here. The cleats are made out of some 4-inch pine as well as the bottom rail spacer.
Step 2: Cleats
Make the cleats by setting your table saw to 45 degrees and ripping the 4" stock in half.
Step 3: Sanding
I sanded all the pieces a bit to knock down some of the primer and other imperfections.
Step 4: Assemble
I then glued and pinned the pieces together using some 18 gauge brads. The whole point of the cleat system is to have two lengths cut at 45-degree angles to lock the shelf into place against the wall. The small piece at the bottom of the box is a spacer for keeping it flat against the wall.
Step 5: Sanding the Joints
I then sanded the boxes down again, smoothing out the joints. Not shown in the tutorial is I filled the nail holes, sanded again and then painted the boxes and the cleats. I used three different colors of paint, which matched the palette of our living room.
Step 6: Mount the Cleats
I found the wall studs with a stud finder and pre drilled my cleats. I used 3-inch screws for mounting the cleats and leveled them as I went.
Step 7: Add the Boxes
I then placed the shelves as desired onto the cleat. My intention is to keep the shelves spaced apart, but the cleated system allows for you to place all the boxes/shelves side by side so that you get a shelf and then additional storage below inside the box.
Step 1: Select Some Lumber
Here are a couple of the oak table leaves I found in my attic which were missing the rest to make a table.
Step 2: Cut the Surface Area
The leaves were about 12" wide and several feet long so first I cut the leaves into 15" lengths.
Step 4: The Cleat "hanger"
Now cut several 1"x3/4"x9" strip (s), depending on the number of shelves you plan on building. I cut more than enough because spares never hurt.
Step 5: Cut the Cleat at a 45 Degree Angle
Next I cut the strip (s) at a 45 degree angle leaving a 1/4" area to drill holes in for mounting. This will make more sense later.
Step 6: Sides
I took a 12"x6" length of wood and cut it in half to make two 6"x6" square pieces. I did this because I am making several shelves. You could simply cut one 6" piece.
Step 7: Draw a Pattern
Using a pencil I measured and drew the lines to make the side support brackets. I decided on a triangle using slightly different dimensions for each side. They are as follows: 4-1/2"x5-1/2"x6-1/2" The bottom I cut so that it is flat and does not come to a point. Again the pictures are worth at least several sentences.
Step 8: Cut the Pattern
Cutting the first angle. I decided to cut the inside out and make the angles 3/4" and 1" to keep in the spirit of making this using a bunch of different dimensions. I should also point out the lack of point at the bottom is 1" wide as well.
What is a French cleat?
A French cleat is a simple bracket made with interlocking 45 degree angles.
How to Cut a French cleat
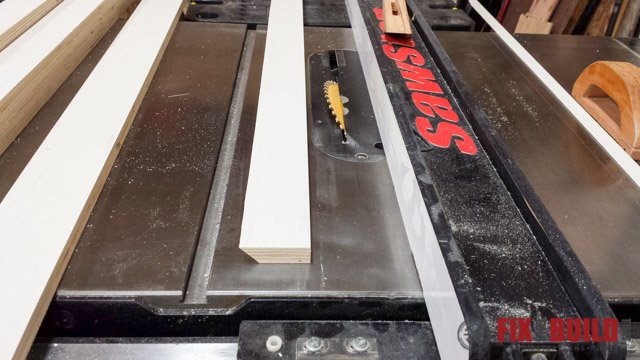
I'm starting with 5" wide strips of 3/4" plywood. This gives me plenty of room to drill two countersink holes per stud later on. I like to mark the angle in the middle of the end of the board with a speed square , then transfer the mark to the top.
How to install a French cleat
Locate the studs in the wall where you plan to install the French cleat. Then drill countersink holes in one half of the cleat where it will line up with the studs. It's important to countersink the screws so the two sides can slide past each other without the screw heads getting in the way.
French Cleat ideas
I've used French cleats, both these wooden DIY versions and metal store-bought ones, for a variety of different projects over the years. Here's some ideas for how to use them around the home.
Cut the Cleat for the Shelf
Use a shorter piece of plywood for the cleat that will be attached to the shelf. Make another 45 degree angled cut along the length of this piece, and line them up when you are finished to see how they will be attached.
Build Your Shelf
Attach two pieces of small plywood using wood screws to create your shelf and then attach the small cleat to the back of the shelf using wood glue and wood screws.
Secure Wall Cleat
Use a level and attach the long plywood cleat to the wall using wood screws. It's best to install the cleat into studs which are typically 16 inches to 24 inches apart.
Check the Cleat for Strength
If you can view a side profile of the French cleat, you should see the two angled pieces of plywood sitting flush against each other with the shelf flat against the wall cleat.
Start Using Your Cleats
We tested this French cleat connection and shelf using a 10 lb. accessories box filled with screws. The joint held up well, but for a shelf this size it's better suited to hold smaller individual tools.
Add Side Supports
You can reinforce the shelf by adding side supports which will help prevent items from falling off as well as provide additional strength when holding heavy items such as pipe clamps.
Organize and store tools and other implements neatly by creating a wall of sturdy French cleats
It may sound fancy, but a French cleat is simply a sturdy beveled support board, a secret that builders and craftsmen rely on to hang heavy items, such as large mirrors, artworks, and cabinets. It’s also become popular to cover as much as an entire wall with French cleats to organize and store tools and utensils.
French Cleat Wall Fundamentals
The purpose of any cleat—a horizontal board attached to a wall—is to help support a heavy item, but a French cleat improves on the concept by beveling the top edge of the cleat to slope downward in back. If you feel the top of an installed French cleat with your fingers, you will notice how the front edge is higher than the back.
1. Choose the Right Material
French cleat walls are usually made from plywood, but don’t use the cheapest plywood (Grades C and D), which often contains knots and weak spots that would compromise the results. Opt instead for Grade A or Grade B plywood, which is denser, smoother, and less likely to warp and splinter.
2. Cut the Angles
The angle of the beveled top edge of a French cleat is 45-degrees, and if you have a miter saw or table saw, cutting the cleats will be a snap. Cutting bevels on any other type of saw is more difficult, so if you don’t have a table saw, ask the folks at the lumberyard where you purchase the plywood to rip it into cleats for you.
3. Keep It Level
Trying to balance and level a cleat as you attach it to the wall can be tricky, so rather than attempt it freehand, draw a guideline on the wall. You’ll need a carpenter’s level (the longer the better) and a pencil. Position the carpenter’s level where you want the bottom of the lowest cleat on your wall, and draw a line along the level’s top edge.
4. Build for Strength
In order for a cleat wall to be strong enough to hold numerous heavy items, the cleats must be securely attached to the wall. Use a stud finder to locate the center of a stud, and then snap a vertical chalk line from the top to the bottom of the stud.
5. Finish and Use the Cleat Wall
After installing as many cleats as necessary to complete your French cleat wall, sand the cleats to smooth away any splintery edges. Painting isn’t required, but brushing on a clear coat of polyurethane will protect the wood and make it easier to wipe away spills.
