Here’s How You Can Make Your Very Own DIY Hangboard
- Materials Required 2 x Hardwood panels: You can use any of the left-over wood. Just ensure that it is hardwood. ...
- Tools Required Pencil or marker Radial Saw ...
- Cut and fix wood panels Your first step should be cutting the wood panels if they are not aligned length-wise. ...
- Outline the holds layout ...
- Start drilling ...
- Chisel the holds ...
- Sand the slots ...
- Add Slopers ...
- Outline your holds. Place the three 2-inch blocks onto one of the 12 x 24 inch plywood panels in the layout pictured above. ...
- Add slopers. We added slopers to the top of our board. ...
- Drill out the holds. ...
- Connect blocks. ...
- Mount blocks. ...
- Add edge trim. ...
- Prepare the mounting backboard. ...
- Prepare the other plywood panels.
How do you make a wooden hang board?
7:5811:32DIY Hangboard: How To Build A Cheap Fingerboard - YouTubeYouTubeStart of suggested clipEnd of suggested clipSo I made as many holes as I felt was wouldn't ruin the integrity of the wood but or interfere. WithMoreSo I made as many holes as I felt was wouldn't ruin the integrity of the wood but or interfere. With the holes that I have and then just for extra. Safety. I used glue on top of that.
How do you make a portable Hangboard?
1:535:14How to Make a Portable Hangboard - YouTubeYouTubeStart of suggested clipEnd of suggested clipI start by sanding the whole rum. And then I pick which side I want to hang off of I'm. BasicallyMoreI start by sanding the whole rum. And then I pick which side I want to hang off of I'm. Basically going to put my wood at an angle. And create an in cut for the edge.
How do you make a Beastmaker?
Step 1: Laser Cut the Router Template. ... Step 2: Prepare the Wood. ... Step 3: Make the Bottom Row of Holds on Bottom Board. ... Step 4: Make the Top and Middle Row of Holds on Top Board. ... Step 5: Make the Top and Middle Row of Holds on Bottom Board. ... Step 6: Glue the Top and Bottom Boards Together. ... Step 7: Round the Edges of Holds.More items...
What kind of wood do you use to hang a Hangboard?
1:4610:11Escape Climbing - Installing A Hangboard - YouTubeYouTubeStart of suggested clipEnd of suggested clipInto all right so now that we found the studs. Now i just simply measure the doorway. And so i'mMoreInto all right so now that we found the studs. Now i just simply measure the doorway. And so i'm going to measure. Outside so on this edge to the frame to the outside over here.
Do you need a backboard for a Hangboard?
Basically, it depends on what your walls are made of. If you have a brick wall to screw into you probably won't need a backboard (but you will probably need different screws and wall-plugs to those supplied). If you have plasterboard you will need to find the joists behind and screw a backboard to them.
How do you build a rock climbing wall?
DirectionsDesign the wall. The kind of wall you build largely depends on the space you have available. ... Build a frame. ... Paint the plywood. ... Drill holes in the plywood. ... Set the T-nuts. ... Attach the plywood to the frame. ... Set the holds. ... Climb on.
How many Max hangs in a session?
One work set is a single hang of 10 seconds using the weight you determined during your assessment session. You'll do 4 to 6 sets of this, resting 3 to 5 minutes between set. That's right: 3-5 minutes of rest between bouts of 10 seconds of work. It's even more boring than it sounds, but it's damned effective.
How do you hang a fingerboard?
0:592:49How to Mount a Hangboard / Project Board over your Doorway - YouTubeYouTubeStart of suggested clipEnd of suggested clipStep 1 locate and Mark the studs above your doorway. Step 2 pull the mounting board up to the wallMoreStep 1 locate and Mark the studs above your doorway. Step 2 pull the mounting board up to the wall so that you can mark the studs on the mounting board as well.
How do you hang a Beastmaker 1000?
Basically you just drill two big holes into the backboard and hang the backboard with slings. If you have a double pull-up bar, you can simply insert straps in between the fingerboard and the backboard (do this before you drill the fingerboard on!) and secure the whole packet to the pull-up bars with the straps.
How thick should plywood Hangboard be?
Carefully line up a piece of ¾-inch plywood and lay it on the blocks. Screw 1½-inch screws into all 4 corners, holding the plywood in place so it doesn't turn. Add at least 4 screws to each block section for extra strength, making sure you don't hit any holds with the screws.
How many studs do you need for a Hangboard?
You will want to go into at least one, if not two or three, studs—not just drywall. This is especially important if you weight more than 150 pounds. When you've located the studs above the door, or found a nice wooden header you can screw into.
Where should a Hangboard be placed in a house?
You must choose where you are going to locate your hangboard. Above a door is very easy, although there are other possibilities if you can get at joists or exposed beams. I opted to put it above a door.
How do you hang a Hangboard without a drill?
0:242:02Simple Parts to Install a Hangboard without Drilling Walls! - YouTubeYouTubeStart of suggested clipEnd of suggested clipAll right the first thing you're going to need is a pull-up bar like this that fits on the doorMoreAll right the first thing you're going to need is a pull-up bar like this that fits on the door frame. Just comes on off and on easy enough no drilling required.
How do you use a portable Hangboard?
Rows:Complete a full body warm up.Edges so they hang about 4ft off the ground.Sit down, grab the jugs (or an edge of your choosing!), and with arms extended, align your head all the way to your feet in a straight line.Complete 3 sets 8 rows by pulling as high up as possible and keeping a straight torso.
How do you hang a Hangboard on a wall?
0:592:49How to Mount a Hangboard / Project Board over your Doorway - YouTubeYouTubeStart of suggested clipEnd of suggested clipStep 1 locate and Mark the studs above your doorway. Step 2 pull the mounting board up to the wallMoreStep 1 locate and Mark the studs above your doorway. Step 2 pull the mounting board up to the wall so that you can mark the studs on the mounting board as well.
Supplies
Dimensions are obviously not critical and you can easily change the plan to your liking.
Step 1: Plan
First of all, we need a plan. You can obviously change the dimensions to fit the lumber you have on hand. Just make sure that your edges are strong enough. I would recomend at least 20 mm. Also, the pockets need to be big enough to comfortably accomodate your fingers, 20 mm should be enough for most people.
Step 2: Getting Lumber
If you have access to a planer and jointer you can bring the lumber to the exact dimensions. If you don't own these tools, just get a piece of wood that is close enough. A simple piece of 2X4 should be suitable.
Step 3: Route the Pockets
This hangboard has 3 edges, which means that you will have to route out 2 pockets for your fingers. I am using a palm router with a 20 mm router bit. If you have a smaller bit, you will have to do it in several side passes. Depthwise, I made the larger 25 mm pocket in two passes and the 16 mm pocket in a single pass.
Step 4: Round Over the Edges
To make the hangboard nice to use, you will have to round over sharp corners. A round over bit is the best tool for this. I did a 6 mm round over and it seems to be good.
Step 5: Drill Holes for Bolts
In my opinion, it is the most convenient to place this hangboard above a doorway. I am securing it with 4 screws. Make sure to drill the holes a little bit oversize so that you can easily align them. Also, use a countersink to make the screw heads flush in the pockets.
Step 6: Sand Everything
The last step is to sand everything to make it smooth to the touch. It is important to sand the edges in a way that the round over nicely blends with the edge and it is pleasant to hang on. I am using the 180 grid sandpaper.
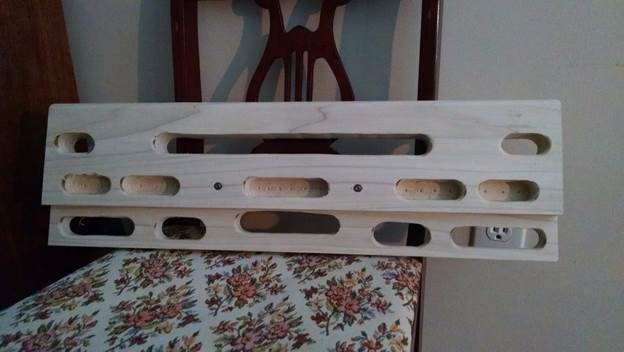
1. Outline your holds
Place the three 2-inch blocks onto one of the 12 x 24 inch plywood panels in the layout pictured above. Use a pencil to outline shape and placement of the holds you want to create. We used a square and large washers to make even shapes. Make sure to leave at least 1½ inches in between holds and edges to maintain the strength of the wood.
2. Add slopers
We added slopers to the top of our board. Use a radial saw or handsaw to make downward-angled cuts to the tops of each 2-inch block. We made the outer slopers 30 degrees and the middle sloper 10 degrees for varied difficulty.
3. Drill out the holds
Drill out the holds using your preferred method. A router with a guide is the easiest way (you can rent one from the hardware store), but you can also use a hole saw or a drill with a Forstner bit like we did. Follow the lines of your hold outlines and work slowly. Make sure to keep the depths of your matching holds consistent.
4. Connect blocks
Note: If we did this project again, we’d place the pocket screws in the center block, connecting to the outer blocks for more strength. (Thanks to a reader comment for pointing that out!)
6. Add edge trim
We used the block-free center section of plywood to add edge holds to our board. The smallest trim should be at the bottom so larger holds don’t get in your way. Apply wood glue to a piece of hardwood trim that has been cut to fit.
7. Prepare the mounting backboard
Place the blocks and board onto a second piece of 12 x 24 inch plywood. This will be your mounting backboard. Clamp the pieces together.
8. Prepare the other plywood panels
Use the backboard as a template for the other 2 modular panels. Place the drilled backboard on top of the 2 remaining plywood pieces and clamp them together. Use the 3/8th bit to drill all the way through at each hole.
Step 0: Get Some Parts
Our first step in the process was to buy a plank at the hardware store that to use for the base board. We chose a finished poplar board that was 30” wide by 15” tall by ¾” thick. This was attractive and gave us a lot of real estate to place holds.
Step 1: Holds Choice and Layout
Next, selected holds and chose how we wanted to place them on the board. We elected for some bolt-on holds on the top, some of which were manufactured and some of which were purchased. On the bottom we placed several edges of varying depth, from 18mm to 6.5mm.
Step 2: Hold Manufacturing
Though we purchased some, we built the majority of the holds for our board out of wood. Here’s a summary of what we did:
Step 3: T-Nut Install
If you want t-nuts for bolt-on holds, start the t-nut installation by lining up exactly where you want to place them. T-nuts vary in the recommended hole size. The last ones I purchased required a 7/16” hole.
Step 4: Standoff Install
We’re installing our board on an indoor wall. The t-nuts and bolts stick out from the back of the wall. We put some short 1” thick planks on the back side to stand the board off the wall a bit.
Step 5: Install the Screw-In Holds
The majority of our holds on this board were edges that we just screwed on. It’s not quite as pretty, but we just used 1” sheet rock screws for the install. Each hold was about 6” wide and we used two screws per hold. We lined up the holds with a square to make parallel and evenly spaced. They looked great!
Materials Required
2 x Hardwood panels: You can use any of the left-over wood. Just ensure that it is hardwood. Ideally, it should be 2 inches thick and should be at least 12 inches tall. The other should be 6 inches tall, and 1-inch wide. You can decide its length based on the number of edges and pockets you want.
Cut and fix wood panels
Your first step should be cutting the wood panels if they are not aligned length-wise. Moreover, if they have any paint residue on them, sand it off with sandpaper.
Outline the holds layout
Before moving on to drilling holes in the hangboard, it is important to decide what kind of layout you are looking for. Create paper cutouts for mono, two-finger, three-finger and four-finger hold. To ensure a uniform design, make two circles and then join them with straight lines, like this:
Start drilling
You can drill out the holes with whatever tool you have. The easiest way is to use a router with a guide. However, you can also use a hole saw or a drill with a Forstner.
Chisel the holds
After using a router or a hole saw, you will get holds that look something like this.
Sand the slots
Depending on the type of grip you want, start sanding the edges of the holds. While sanding the rough edges out, make sure no splinters or rough parts are standing out to prevent any injuries. This is the step that will take the longest.
Add Slopers
Using a radial saw or a hand saw, make two downward angled cuts for slopers. Make sure you measure the angle of the sloper and cut it evenly on both sides. For varied difficulty, you can even cut two different angled slopers.
DIY Hangboard Ideas
Building one from scratch could be a good option if you're new to hangboards or need a new training tool and want to follow the DIY path. Here we have added some of the experienced woodworking projects and beginner-level projects for hangboards. There are many different ways to design a DIY hangboard, but it is most important to get the job done.
Homemade Hangboard
This is just a simple homemade Hangboard I made for my climbing wall. There are plenty of other plans out there, but this one fits my needs and budget. Given how cheap the materials were, I think it turned out awesome. The project took about 10 hours but was spread over five days (working full time).
Homemade Hangboard
This DIY Hangboard or wooden hang board is inexpensive, and it can be made within a couple of hours by a handyman or a home handywoman. And the best part, this homemade hangboard will last for more than several years.
DIY Hangboard
This is an affordable hangboard that you can easily DIY. This one's made from wood with the dimensions of 100 x 90 x 40 mm, an additional 10 mm in-depth for the distance for screw holes. Go for a mid-size board if you want to do hard hangs but if you want to work on your finger strength, go for a thicker board.
DIY Hangboard Mount
This DIY hangboard tutorial will show you how to make a perfect mount for your hangboard. This hangboard can be used by both beginners and advanced climbers. Even if the actual process of making the hangboard sounds a bit complex, this tutorial will present everything in an easy-to-digest fashion.
How To Mount A Hangboard Without Drilling
Not everyone is great at using drills and other complicated machinery. If you are one of the people who do not have a flair for using equipment to create masterpieces, then this DIY guide will teach you how to mount a hangboard in your home without drilling. This Hangboard will help you build strong fingers and improve your pulling skills.
Making A Climbing Hangboard
Many of the standard hang boards use two 2x4s for the structure. This is not going to work if you want to set your grip as far apart from each other as possible to suit the overall width of your hand. Therefore, it is better to make a custom hang board. This can easily be accomplished by getting two 2x10s and splitting them in half.
