
DIY Marking Gauge
- Step 1: The Sketch ...
- Step 2: Technical Drawings ...
- Step 3: Cutting the Wood ...
- Step 4: Cutting Out the Main Parts ...
- Step 5: Sanding and Sizing the Parts ...
- Step 6: Making the Groove ...
- Step 7: Working on the Sliding Piece ...
- Step 8: The Knob ...
Full Answer
How do you make a simple fence gauge?
How to Make a Simple Marking Gauge. Step 1: Cut Out the Wedge. The wedge is 1 1/2" long overall. The lip is 3/16" wide and 5/16" tall, and the angle goes from 3/16" to 5/16". I used a ... Step 2: Cut the Beam and Fence Pieces. Step 3: Cut the Angled Fence Piece. Step 4: Glue Up the Fence Assembly. ...
What is a marking gauge?
More About Kinderhook Woodcraft » A marking gauge is a tool used to layout joinery in woodworking, or to establish a cut line. My version is based on the English pattern. The gauge consists of a beam and a fence, which is locked in place with a wedge.
How do you use a marking gauge jig?
Tighten the wood screw to keep the blade in place. Insert the brass rod (shaft stock) into the center hole of the the marking gauge. Rotate the jig by hand with the blade touching the face-side or back-side of the marking gauge.
What is the body of the gauge made of?
The body of the gauge is made of a hardwood block which starts out as square stock with dimensions 2" x 2" x 1". The first step in forming the body is to mark and remove the corners. To do this:
How do you make a simple marking gauge?
3:1414:09Make your own marking gauge for FREE! - YouTubeYouTubeStart of suggested clipEnd of suggested clipAnd prepare it so it's smooth on all four sides. Then plane off all four of the corners. So that youMoreAnd prepare it so it's smooth on all four sides. Then plane off all four of the corners. So that you have an even octagon. Shape then plane off the corners. Again so your piece has 16 sides.
What materials are used to make a marking gauge?
A marking gauge is used to mark a line parallel to a straight edge. The stem and stock are made from beech and the thumbscrew from clear yellow plastic. The better quality gauges have brass inserts at the front of the stock.
How do you make marking tools?
0:4721:247 Homemade Marking Tools for Woodwork - Scrapwood ... - YouTubeYouTubeStart of suggested clipEnd of suggested clipKeep them lined up I'm using a couple of pieces of scraps with packing tape. And then clamp to theMoreKeep them lined up I'm using a couple of pieces of scraps with packing tape. And then clamp to the sides. Now we need to make sure that both edges of the stock.
How do you make a marking wheel gauge?
0:244:05Making A Marking Gauge - YouTubeYouTubeStart of suggested clipEnd of suggested clipThe marking gauge is basically made with two parts a dowel. And a block to make the dowel i'mMoreThe marking gauge is basically made with two parts a dowel. And a block to make the dowel i'm quickly making a dowel maker. First i'm drilling 1 8 inch pilot holes. Next i'll drill quarter inch hole.
What are the four parts of a marking gauge?
The basic marking gauge consists of four parts: an 8– to 12"–long beam, a fence, a fence-locking device, and a marking pin, as shown below. The fence slides along the beam to set the required marking distance to the pin. A locking device, such as a thumbscrew or wedge, secures the fence to the beam at the set position.
How do you make a wooden marking gauge?
3:136:423 Easy to Make Homemade Woodworking Marking Gauges ...YouTubeStart of suggested clipEnd of suggested clipSo we have to rely on some hardware store solutions. I'm gonna use some quarter-inch thumb screws.MoreSo we have to rely on some hardware store solutions. I'm gonna use some quarter-inch thumb screws. And just tap right into the wood or you can even use some thread insects.
What are 5 marking tools?
Unfortunately, no marking tool is ever 100% consistent.Tailors chalk. ... Chalk cartridge pen. ... Chalk pencils. ... Tailors beeswax aka wax crayon. ... Air-erasable pens (AKA disappearing ink) ... Chaco liner pens. ... Carbon paper and tracing wheel. ... Tailors tacks or thread basting.
What is the use of marking gauge?
A marking gauge, also known as a scratch gauge, is used in woodworking and metalworking to mark out lines for cutting or other operations. The purpose of the gauge is to scribe a line parallel to a reference edge or surface. It is used in joinery and sheetmetal operations.
Which is used as marking tool?
Pencil – Used to mark lines and centres for cutting or joining. Pencil marks are easy to remove afterwards. It is best to use a sharp pencil very lightly. This gives thin, light lines that don't engrave the workpiece.
What is the material used in manufacture of machine shop marking table?
It is made of cast iron, graphite, or ceramic. Some surface plates are flat by lapping to a precision of 0.0025 mm.
What are examples of marking tools?
Unfortunately, no marking tool is ever 100% consistent.Tailors chalk. ... Chalk cartridge pen. ... Chalk pencils. ... Tailors beeswax aka wax crayon. ... Air-erasable pens (AKA disappearing ink) ... Chaco liner pens. ... Carbon paper and tracing wheel. ... Tailors tacks or thread basting.
Which gauge is used as a marking tools?
A marking gauge, also known as a scratch gauge, is used in woodworking and metalworking to mark out lines for cutting or other operations. The purpose of the gauge is to scribe a line parallel to a reference edge or surface.
What are marking out tools?
Marking-out toolsPencil – Used to mark lines and centres for cutting or joining. ... Try square – Used to help draw perpendicular lines on materials to mark out the sides of a woodwork joint. ... Marking gauge – Used to scribe lines parallel to edges so that waste wood can be chiselled away from a woodwork joint.
What is a marking gauge?
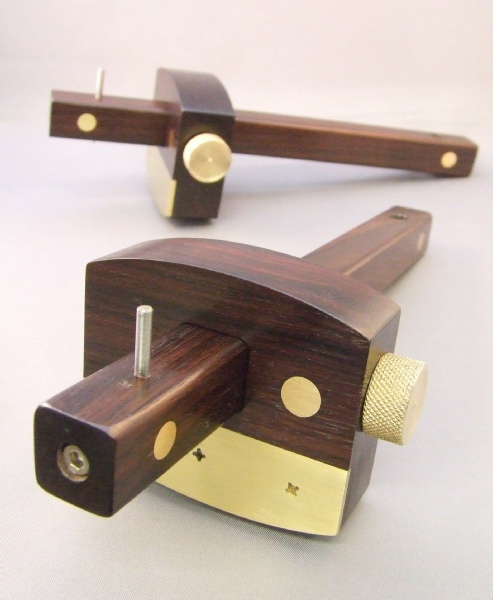
A marking gauge is one of the most essential tools of every woodworking workshop. It is used to, very precisely, mark distances to the workpieces. The one I have made is a traditional one and the wood I choose to use is a wonderful and quite rare wood called Carob (Ceratonia siliqua).
How to cut a groove in a sliding piece?
The first step was to mark the groove using the sliding piece as a reference. I always prefer to do that way over measuring. Then I cut the two edges of the groove with my Kataba saw and for last I removed the excess with a chisel a little narrower than the groove. I always checked for perpendicularity during the process.
What drill bit do I use to make a blade?
To make the blade I have used an old 4mm drill bit that I have first cut to length and then shaped and sharpened with a little sharpening stone mounted on a drill.
Why use marking gauges?
More About vreinkymov ». Marking gauges are used in woodworking because they let you lay out precise markings for mortise and tenon, lap, and dovetail joints. The following instructable describes how to make a marking gauge with a round blade.
What is a gauge made of?
The body of the gauge is made of a hardwood block which starts out as square stock with dimensions 2" x 2" x 1". The first step in forming the body is to mark and remove the corners. To do this:
How to clean a metal rod?
Clamp the rod into a bench vise, using leather, cloth, or rubber to protect the rod from damage. Place the tapping jig over the rod with the center hole facing up. Lubricate the tap with tapping fluid and insert it into the jig. Use the twist-bit which made the center hole to clear out metal debris.
How to finish corners with a hand plane?
A hand plane is used to finish the corners. Do this by: Clamp wood into a wood vise. Protect the clamped corners using leather, cloth, or rubber pads. Plane with the grain. If your plane blade is sharp, it should not bind or skip, otherwise check that you're planing with the grain.
How many blade blanks are needed for a sanding machine?
Only one blade blank is needed and can be made out of 1/16" x 1/2" x 1/2" unhardened (annealed) oil hardening (O-1) tool steel. For multiple cut depths or different angles, more than one blade blank can be made. The process for making blade blanks is:
Step 1: What You Need
I'd like nothing more than to wax philosophical about our metaphysical properties, but this is an Instructable, and, as such, requires "stuff". Here are the thing you'll need. - Safety glasses - Two dowel scraps of different diameters. I chose an oak dowel at 3/4" and a poplar dowel at 3/8" - A scrap block of wood - A Scrappy-Doo coloring book.
Step 2: Anatomy of a Marking Gauge
Before building a tool, it helps to know what the parts are and how they work.
Step 3: Marking the Stock for the Locking Dowel
You need to make some marks on the stock. It would be handy to have a marking gauge for this, but you would probably be building this because you don't have a marking gauge.
Step 4: Drill the Holes
You might have guessed it. You need to drill some holes now. The first hole to drill is the one the goes from edge to edge. The 3/8" dowel will go into this hole. I would recommend drilling a test hole to see how well the dowel fits.
Step 5: Cut the Tensioning Dowel
Okay, place the smaller dowel in the hole and push it through until about a half inch sticks out the other end. Use a pencil and mark the edge of the large hole onto the exposed part of the dowel. Cut out a notch the side of the marks. Don't worry about making it round.
Step 6: Refuel the Manufacturing Machine
Mount a standard sized bowl of ice cream to the workbench and apply to the main manufacturing machine in the typical style. THIS STEP IS CRITICAL! Failure to refuel at this point may result in complaining of fatigue and snarky comments from a spouse.
Step 7: Adding the Spur
Drill a small hole in the end of the stem. This hole should snugly accommodate a nail of your choosing. Use a file to bring the nail to a very fine point and drive it into the hole in the stem. Cut the head off the nail and file it.
