How to Nail Tongue & Groove Boards
- Step 1. Lay the first course of tongue-and-groove board in the desired location. Plum the board with a level if you're...
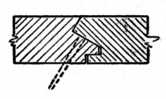
- Step 2. Nail the fasteners directly through the face of the first course of tongue-and-groove board, near the groove.
- Step 3. Secure the opposite end of the board by angling nail fasteners at a 45-degree angle and...

How do you finish shiplap tongue and groove walls?
You can either apply finish to the raw wood on each chamfer before nailing up each board or touch up the entire shiplap ceiling after it's finished. Always plan your work so the tongues point toward the direction of installation. One of the cool things about tongue and groove walls is that you can use a technique called "blind-nailing."
Can you use a cordless Nailer on shiplap?
If the tongue part of the shiplap is sufficiently wide, you can drive the nails into this section. The parallel row's overlapping tongue will cover the nails. If there is not enough room on the tongues, then face-nail into place with the cordless nailer.
How do you nail tongue and groove walls?
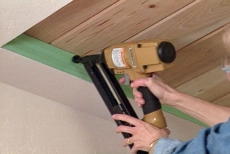
Drive the nails through the shoulder of the tongues into the framing at about a 45-degree angle. The next grooved edge will hide the nail holes. A 15- or 16-gauge brad nailer with 2-in. nails is the best choice for fastening, although an 18-gauge nailer will do the job, too. Beat them in! Installing tongue and groove walls can be a real workout.
What size nails do you use for tongue and groove?
For three-quarter-inch pine, 2-inch nails are appropriate. When you have the ceiling prepared for the first piece of tongue and groove wood, nail it to the ceiling by putting nails diagonally through the tongue and into the ceiling. Use a pneumatic nailer for this process to allow you to put the nails in place quickly and with ease.
How do you attach tongue and groove shiplap?
Avoid visible nail holesInstall planks with the tongue up.Nail at an angle directly through the tongue and into your studs. You don't need to nail through the face of the planks anywhere but on the bottom row and near the ceiling.Start with the bottom row first and work your way up.
How do you attach a tongue and groove board to the wall?
Leaving a gap of 1/2″ at each wall surface for expansion and start to install the first row. Install the plank with groove closest to the wall. Secure the first row by nailing into the tongue to the joist, (or furring strip) and secure the groove side of the plank by face nailing into the joist.
How do you nail 1x6 tongue and groove?
4:1215:40How to Install Tongue and Groove Ceiling Boards - WindsorONEYouTubeStart of suggested clipEnd of suggested clipPattern. We want to be at an angle like that in that tongue. So we don't want to be in thisMorePattern. We want to be at an angle like that in that tongue. So we don't want to be in this chamfered edge right here. That's obviously not going to be a blind nail. We want to hide it in the tongue.
What nails do you use for tongue and groove?
A 15- or 16-gauge brad nailer with 2-in. nails is the best choice for fastening, although an 18-gauge nailer will do the job, too.
How do you nail tongue and groove planks?
1:218:58Tongue and Groove Accent Wall - Part 1 - YouTubeYouTubeStart of suggested clipEnd of suggested clipThey're gonna do stacked right on top of each other it also allows me to put nails in and actuallyMoreThey're gonna do stacked right on top of each other it also allows me to put nails in and actually having hidden. Inside the groove.
Should you glue tongue and groove?
Don't Glue Tongue and Grooves This is because wood flooring needs room to move as it expands. If the wood is glued both to the subfloor and between the planks, there's no room for movement. In the long-run, limited movement leads to cracks, disfigurement and warping of your wood flooring.
Which side of tongue and groove faces out?
The smooth side should be fitted so it faces outward. Check your planks before you install them. Make sure the rough side is against the wall, ceiling, or floor. This will give a more professional finish.
What screws for tongue and groove?
Minimum size recommended - #7 x2” stainless steel trim head screw. Manual or pneumatic floor nailers will work as well. When using floor nailer use stainless steel 2” serrated T nails.
Is tongue and groove the same as shiplap?
Shiplap is a type of paneling made from different types of materials with an L-shaped lip on both sides where the panels overlap. On the other hand, tongue & groove refer to a type of paneling that can be made with different types of materials to form an indentation and a protrusion where the groove panels interlock.
Can you use a brad nailer for tongue and groove?
A brad nailer cannot handle the larger finishing nails required for tongue-and-groove paneling. Power-actuated nail guns are too powerful for the task and are used for nailing into masonry or cement.
What type of nail gun do you use for shiplap?
Use a nail gun with 18 gauge 1 3/4”long brad nails. Nail through the top flange which is the longer of the two flanges. On the first board a second nail should be placed approximately 1” from the bottom edge.
How do you screw tongue and groove?
1:444:26How to Install Wood Floors with Tongue & Groove (Hidden) ScrewsYouTubeStart of suggested clipEnd of suggested clipStart the screw driver slowly. Because the screw has a little almost like a sort of drill drill bitMoreStart the screw driver slowly. Because the screw has a little almost like a sort of drill drill bit at the end of it too to start it off in the in the floorboard.
How do you attach wood planks to the wall?
3:207:55How to Install a Decorative Wood Wall For Less than $200 - YouTubeYouTubeStart of suggested clipEnd of suggested clipAnd once the boards are cut to length you can put them up against the wall line them up with theMoreAnd once the boards are cut to length you can put them up against the wall line them up with the line that you drew to make that first row level. And then take out your nail gun.
How do you put on tongue and groove?
4:3312:20How to Install Tongue and Groove Ceiling Cladding - YouTubeYouTubeStart of suggested clipEnd of suggested clipIn either case i find it easiest to start at one end get the tongue and groove fit together. AndMoreIn either case i find it easiest to start at one end get the tongue and groove fit together. And then work along the board toward the other. End. I don't put any nails in until i get it positioned.
How do you fasten tongue and groove pine boards?
Fasten each board using a 2” 15 gauge nail on each joist. On the cut side, nail it 1/2” from the edge to prevent splitting the wood. On the tongue side, nail it through the tongue at an angle so the next row covers the nail.
How do you install wooden cladding on interior walls?
2:005:55How to fit internal cladding - YouTubeYouTubeStart of suggested clipEnd of suggested clipSo we're going to fix the cladding directly onto the wall using grab adhesive if the wall surface isMoreSo we're going to fix the cladding directly onto the wall using grab adhesive if the wall surface is dusty clean it and seal it with a diluted PVA adhesive and allow time for it to dry.
What is shiplap?
Shiplap is basically a shingled siding. It's horizontal boards, and each board overlaps the one below it—much like the shingles on a roof. It's usu...
How much should you overlap the boards?
That depends on the dimension of the board. If your boards are 8 or 10 inches wide, you might do 1-2 inches of overlap. If your boards are smaller,...
Where do you put the nails in shiplap boards?
You want to fasten each board in the area that's going to be covered by the board above it. You don't want to run nails or screws through an expose...
Where do you put shiplap on a wall?
You can start applying shiplap either at the top or at the bottom of your wall . If you start at the bottom, gravity will work for you. If you start at the top, you’ll have to prevent each board from falling before you nail it in place.
Where do you put nickels on shiplap?
If you’re installing shiplap from the top of the wall down, you’ll need to carefully hold the nickels in place on the bottom of the board as you line up the next plank.
How wide is a shiplap wall?
For example, if your wall is 20 feet (6.1 m) wide and your shiplap siding is only 15 feet (4.6 m), you’ll need to cut an additional 5 ft (1.5 m) section of shiplap to finish the row. Even if your boards would fully span the width of your wall, consider staggering your shiplap anyway.
What is shiplap siding?
Shiplap is a distinctive type of siding which is formed from long, horizontally stacked boards. This siding was initially used on the sides of wooden ships to keep them watertight. Shiplap is currently used for decorative purposes indoors, as its stacked boards create a distinctive visual effect.
How to measure shiplap?
Using a tape measure, measure the wall on which you’ll be installing shiplap boards from one side to the other. Then, use the tape measure to measure the same distance on each of your shiplap boards. Mark the distance with a pencil.
How thick is shiplap?
Purchase your shiplap material. Shiplap boards are thin (about 1 inch (2.5 cm) thick). Shiplap boards have a small groove in the bottom and a small ridge on the top. This feature allows them to be stacked easily. If you can’t find actual shiplap (or find the price prohibitive), it’s common to use 1 in × 6 in (2.5 cm × 15.2 cm) boards instead of actual shiplap. These should be available at most hardware stores and lumber yards.
Can you paint shiplap before installation?
If you’d like the shiplap boards to match or coordinate with a dominant color in the room you’re decorating , you can paint the boards prior to installation. White and black are both popular colors.
Where to install shiplap?
Interior shiplap is generally installed in dry areas. If you wish to install the shiplap in bathrooms, sinks, or near wet areas of kitchens, make sure that it is either waterproof or that you apply a waterproofing treatment to the shiplap after installation.
How high should shiplap be above the floor?
At the bottom of the wall, the last row of shiplap ideally will be parallel to the floor and about 1/8- inch to 1/4-inch above the floor. However, it is only coincidental if this truly happens. Generally, the last row might be higher than 1/4-inch or it might run at a slight angle to the floor.
What Is Shiplap?
Shiplap is exterior house siding that comes in long, horizontal boards that overlap each other at the long edges. A shiplap board overlaps the top 1/4-inch of its lower neighbor to create a joint that is weather-proof and stable.
What is interior shiplap board?
Interior shiplap board brings the charm of exterior shiplap indoors, with a few modifications. Interior shiplap is made from a softwood such as pine, hemlock, or a composite fiberboard, rendering it unsuitable for outdoors but perfect for interior use. Interior-use shiplap, too, is thinner than the exterior board.
How to condition shiplap?
Condition the Shiplap to the Room. Unbox and lay out the shiplap in the room where it will be installed to condition it to the room's temperature and humidity. Unwrap it from any outer plastic wrap. Give yourself room in front of the wall to work.
How many screws are needed to install shiplap?
Floor-to-ceiling vertical strips of one-by-three softwood are initially screwed to the wall, four screws per board. Each strip placement mirrors the placement of the stud below. Finally, the shiplap is nailed horizontally over the furring strips.
What is shiplap siding?
Shiplap is exterior house siding that comes in long, horizontal boards that overlap each other at the long edges. A shiplap board overlaps the top 1/4-inch of its lower neighbor to create a joint that is weather-proof and stable. Interior shiplap board brings the charm of exterior shiplap indoors, with a few modifications.
How to identify shiplap?
You can identify shiplap by the L-shaped groove, or rabbet on the edges of the boards. During installation, these grooves fit together like steps to create an overlapping effect and allow each plank ...
What is Tongue and Groove?
Similar to shiplap, tongue and groove is a style of joining two wood panels together. However, there are key differences that make these two styles different. Specifically, when looking at a tongue and groove plank, you’ll see that one side of the board has a projection called a “tongue” and the other side has an open slit called a “groove.” This system interlocks the panels, so they fit perfectly together, allowing for an easy installation process. It also hides nails, giving it a smoother look overall.
Does Northern Log Supply have tongue and groove?
Northern Log Supply has both shiplap and tongue and groove paneling available, direct from the forest. To complete your project, we also offer a variety of pre-finishing and pre-stain colors for even easier installation.
What is tongue and groove board?
Installing tongue-and-groove (aka T&G) boards is a fast, inexpensive way to panel any ceiling or wall. You can install T&G over bare framing, drywall or plaster, so it's a great cover-up for an ugly ceiling.
Can you mark electrical cutouts on tongue and groove?
It's really tricky to accurately mark cutouts for electrical boxes and other ceiling openings on tongue and groove. The secret is to scribe and/or mark as much as possible in place on the shiplap ceiling rather than to try to measure everything perfectly.
Can you put tongue and groove together?
(2) You have to seat the tongues and grooves together, and they don't always want to marry. (3) Tongue and groove isn't always flat, so you have to force the boards together to get them seated.
Can you fit grooves in tongue and seat?
Break off the groove flanges. On any installation, you'll have times when you can't fit the groove in the previous tongue and seat the board. In fact, it's almost always the case with the very last board. But it can also happen at shiplap ceiling protrusions or even at projecting inside corners.
Can shiplap be lifted into place?
But it can also happen at shiplap ceiling protrusions or even at projecting inside corners. The only option is to eliminate the back of the groove so you can lift the board directly into place without locking the joint together. The easiest way to do this is to break off the flange with a few hammer raps.
Can tongue and groove be painted?
Tongue-and-groove boards are notorious for shrinking and expanding with changes in temperature and humidity. Unfinished tongue and groove boards installed in humid summer conditions can be an ugly mess during the dryness of winter. As the wood dries and shrinks, unfinished stripes will appear where the tongues withdraw from the grooves. But if you apply finish before installation, the tongues will be completely finished—no unfinished stripes to appear later! You could also opt for paint to finish your boards for a white shiplap ceiling look.
What is the gauge of a nail?
A nail's gauge represents its diameter. Common gauges for nails used in tongue and groove installation include 15, 16, 17 and 18. The gauge of a nail has nothing to do with its length. As such, it's possible to use 15-gauge nails with lengths of 1 inch, 1.5 inches or 2 inches. As the gauge of a nail increases, the nail is smaller. For example, a 15-gauge nail has a diameter of 0.072 inches, whereas an 18-gauge nail's diameter is 0.048 inches.
What is the difference between a 15 gauge and an 18 gauge nail?
For example, a 15-gauge nail has a diameter of 0.072 inches, whereas an 18-gauge nail's diameter is 0.048 inches.
What is the diameter of a 16 gauge nail?
For example, a 16-gauge nail has a diameter of 0.063, which is only a fraction of an inch smaller than 15-gauge nail and very difficult to notice without using a digital caliper. Advertisement.