7 Simple Steps to Planning a Tiled Kitchen Backsplash
- Create a Vision for Your Tile Project. There are hundreds of tile designs, colors and concepts for you to choose from, so the process can sometimes feel overwhelming.
- Ask Yourself Questions. What style do you want to create in your space? ...
- Set Timelines. ...
- Hire a Pro or DIY. ...
- Find Electrical & Other Backsplash Obstacles. ...
- Allow Time to Design. ...
- Place Your Order. ...

How much does it cost to install a tile backsplash?
Cost To Install Tile Backsplash. Installing a tile backsplash costs on average $1,000 – 1,250. The most affordable backsplash using ceramic tile costs $600 – 750, and you can expect to pay $1,700-2,300 for a more expensive backsplash using natural stone, glass, or metal. Depending on your contractor, labor may cost an additional $10 per ...
How to drill into a tile backsplash?
Steps for Drilling Through Tile
- Figure out what kind of tile you have. Glazed ceramic tile is the most common, what you’ll find in almost every older home, and the easiest to drill ...
- Have the right bit for ceramic tile. Standard drill bits don’t work on tile, but not to worry. ...
- Layout the wall for success. ...
- Drill slowly. ...
- Speed up at the end. ...
What is the easiest kitchen backsplash to install?
- Install your tile liners before you custom cut your final regular tiles
- Make sure to align your liner tiles straight and spaced properly
- Back butter the tile liners and install
- To secure them temporarily we used painter’s tape
- With the liner edges in place, custom cut and install your last regular tiles
How to tile your kitchen backsplash in 5 steps?
Step 2. Sand the backsplash with the sanding block, scuffing it up to give the primer better adhesion. Step 3. Mask around the tiles with painter’s tape. Cover the surrounding counter area with painter’s paint or a drop cloth. Step 4. Prime the tile with a latex bonding primer.

When tiling a backsplash where do you start?
No matter how big or small, whether you are going up or down or what type of tile you are using, where you place the first tiles of a backsplash is always at the same place. The magic spot is the base of the backsplash along the countertop edge or lip if it goes up the back of the wall in the center of the countertop.
Where should a backsplash start and end?
The main purpose of a backsplash is to make for easy cleanup. Run your backsplash along the walls of the kitchen adjacent to your food prep areas. Run your kitchen backsplash between upper and lower cabinets. The backsplash connects the two sets of cabinets, which helps the room feel bigger and more cohesive.
Should you start tile backsplash in the corner?
Step 1: Lay Out Your Backsplash Tile Design If you are doing a straight wall—like my laundry nook, it's best to start at the center and work your way outward. However, if you are doing a corner, it's better to start in the corner and work your way out.
Should backsplash line up with cabinet or counter?
Backsplashes need to line up with the upper cabinet. Align the tile backsplash with the upper cabinet. It doesn't have to align with both although that would be nice! Usually the end of the backsplash tile, if aligned with the uppers, will die ON TOP OF the countertop below.
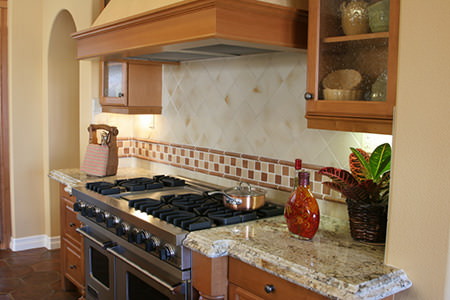
Do you put backsplash behind stove?
You need a backsplash behind the stove to protect from grease and cooking splatter that could damage the surface behind the stove. The backsplash should be made of durable, nonabsorbent, and easy to clean material that will not discolor easily.
When tiling a wall Do you start at the top or bottom?
Here's how you do it: Install the first four tiles in a pyramid: three on the bottom and one on top. Every subsequent row is a process of draping over the pyramid, back and forth. Begin your first drape on either the right or left side, and bring it up, over, and down the other side.
Can you start and stop laying tile?
It's more difficult to stop and restart tiling then to pause and restart grouting. Grouting is usually a much faster process then laying down tile, and can often be done in one day (especially if you're working in a team like us!), but they're still times when you want to pause grouting and continue the next day.
Do you overlap tiles corners?
Tile corners should overlap. You want them close enough to each other that there isn't a huge space in the corner. So leave only enough room to squeeze them in next to each other. If there is a small gap, your corner bead will hide it.
How far up should kitchen backsplash go?
In general, the backsplash is installed to the height of four inches from the surface of the countertop. These backsplashes can be of any material or color, but we suggest that it compliments the cabinets and the countertops.
Where do you stop a backsplash around a window?
Look for a natural ending point, such as the bottom of the upper cabinets or the window ledge. The three most common ending points are the bottom of the upper cabinets, several inches above the bottom of the upper cabinets, and the ceiling.
How do you finish the edge of a backsplash?
Leave the Edge Alone Complete the edge by applying a piece of painter's tape to the wall next to the tiles. Squeeze a thin line of caulk down the outside edge of the tiles where they meet the wall. This blends the tiles into the wall, giving it a clean, finished look.
How do you end a kitchen backsplash?
1 | Trims. Using accent tile trims is the most common way to finish a kitchen backsplash edge. ... 2 | Metal Edges. The metal edge look is becoming more and more popular to finish the edge of tiles. ... 3 | Glazed-Edge Tiles. ... 4 | Caulked Edge. ... 5 | Create Your Own Bullnose Edge. ... 6 | Have a Wooden Trim Edge.
Prepare the Walls for Tile
A tile backsplash in the kitchen may be applied over clean, level drywall since sinks aren't considered wet areas, like showers, that require backer board. Before you begin, watch What's Inside My Wall?
Plan the Tile Layout
Tile backsplashes need a 1/8-inch expansion gap around the perimeter where the tile meets the cabinets and countertops.
Tile the Backsplash
Make sure you follow the manufacturer's instructions on mixing and drying times.
What to start with when you have never done tile?
If you’ve never done any tiling before, I highly recommend starting with something simple like a subway tile or larger rectangles as opposed to the smaller tiles that come in sheets. They’re just a little easier to work with. . Once you’ve got your tile, you need to pick up a few more items, then, you’re ready to go.
What is the last step in grouting?
The last step is caulking. Once the grout was dry, I caulked the edges, corners, and where the tile meets cabinets, trim, or counter top with caulk that matched my grout color.
Can you use tile adhesive on a shower?
If you are tiling a shower, this is NOT what you want to use. For that, you want to use a tile adhesive appropriate for wet locations–like a mortar. And you’d also need to take a few extra steps to prepare the wall to take the tile…like a cement board backer, possibly a waterproof membrane, etc.
No two tile backsplash projects will lay out the same
Aside from the fact that tiles vary widely in size and shape, the height of the backsplash, placement of electrical outlets, whether there is a window or not, and how the tile will terminate at either end of a run are all considerations.
Start at the countertop
For a subway-tile backsplash like this one, my first priority is to always maintain the running bond pattern. I also like to start with a full tile at the countertop, and let the uppermost row of tiles fall as it will, cutting the pieces to fit against the bottom of the wall cabinets. From there, the layout is a bit more trial and error.
Keep the running bond pattern running
There’s no universal starting point for the layout, so I plan horizontal and vertical layouts around focal points, such as a range hood, inside corner, or any highly visible area. If the kitchen layout includes inside corners, I prefer to carry the layout from one wall to the other without deviating from the running bond pattern.
If you have a feature detail, get it right
For mosaic tile accents it’s more about symmetry than anything else. Don’t let the size of the mosaic be dictated just by the space it’s going into, but also by the tile itself. The tiles closest to the edge of the mosaic should be either full, or half—anything more or less than half looks like a mistake.
How do I end a backsplash?
If you plan to end the backsplash with a schluter strip, measure, cut and install the strip before tiling and incorporate into your layout plan. Simply add the strip where you'd like your backsplash to stop with thin-set mortar.
How do I install tile sheets?
Install the whole tile sheets first, lining them up with your reference marks (you'll be able to just see them through the thin-set mortar). Keep the joints between the sheets consistent using spacers. Once it's applied, pull the sheet back to check for voids. Apply more thin-set mortar as needed.
How do I install mosaic tile on a wall?
Start by removing any wallpaper or loose paint. Sand the wall and sponge away sanding dust for good adhesion. With the wall clean, tape your mosaic tile sheets in place to check your layout. Cut sheets as needed using a utility knife, cutting the mesh from behind. Work out how you will handle any gap between the tile and the bottom of the wall cabinets. Aim for a gap as close as possible to a half tile. You can start your tiles without a grout line along the countertop or leave a grout line to help close the gap above. Tape sheets in place all the way to the corner, again trying to achieve a gap no larger than a half tile. Mark the location of the sheets as you remove them.
How long does it take for grout to set between tiles?
spreading grout between tile. Allow the thin-set mortar to set (usually 12 hours), then mix the grout. Work the grout into all the joints by moving the grout float across the tiles vertically, horizontally, and diagonally. Fill all voids between the tiles with grout. 12 of 15.
How do I spread mortar on a wall?
spreading mortar with tile trowel. Tape your drop cloth to the counter. Ladle thin-set mortar onto the wall, and carefully work it with a notched trowel to make smooth, even ridges. Check manufacturer's specifications for recommended trowel notch size (1/8 inch is common).
What tools do I need to cut tile?
You’ll need basic tile tools, available at home centers and tile stores, including a 3/16-in. trowel and a grout float. You’ll also need mastic adhesive, premium grout and grout sealer. You can rent a wet saw to cut the tiles (about $40 for four hours, or $55 for the day). Family Handyman.
How to get grout off tile joints?
Work the grout into the joints by moving the float diagonally over the tiles (Photo 5). Hold the grout float at a 45-degree angle to the tile. Scrape off excess grout with the float after the joints are filled. Ten minutes after grouting, wipe the grout off the surface of the tiles with a damp sponge.
How long should I let tile sit before cutting?
Individual tiles are too small to cut (the blade can send them flying!). Let the tile sit for at least 30 minutes, then apply a grout sealer if you're using natural stone (like slate) or unglazed quarry tile. The sealer keeps the grout from sticking to the tile (it's not needed for nonporous tiles such as ceramic).
How much does it cost to install tile on Saturday?
You can install the tile on Saturday and then grout it on Sunday. Professionals charge about $20 per sq. ft. for installing the tile (plus materials), so you’ll save $20 for every sheet you install yourself. The sheets cost $8 to more than $20 each at home centers and tile stores.
How do I move tile?
The sheets aren't perfectly square, so you may need to move individual tiles to keep joints lined up. Move the tiles with your fingers or by sticking a utility knife blade in the joint and turning the blade. If an entire sheet is crooked, place a grout float over the tile and move the sheet.
How do I fit tile under cabinets?
If you're lucky, you can fit the tile sheets under upper cabinets and around outlets by cutting the mesh backing with a utility knife. If not, you'll have to cut the tile with a wet saw.
When do you need extenders for tile?
The National Electrical Code requires extenders when the boxes are more than 1/4 in. behind the wall surface. It's easier to put in extenders now and cut tile to fit around them than to add them later if the tile opening isn't big enough. Set the extenders in place as a guide for placing the tile.
Plan, Plan, Plan
Before jumping feet first into a project like this you really do need to take your time and develop a plan. Picking out backsplash materials can be fun but trying to incorporate your new “idea” into a real working design can be a tall task.
Draw A Sketch
They say a picture is worth a thousand words and that’s so very true when it comes to a sketch! There are several ways to create a useful sketch from using graph paper to a full blown CAD drafting software. The reality is a piece of graph paper can work just as well as anything.
Take Your Time
As you can see this can be quite complicated. The key is to take your time and try different layouts. It’s much easier to figure this out on paper instead of putting tiles on the wall and then tearing them all down.
1. Start with the Space & Idea in Mind
To get started, first think about which part of your home you want to install a mosaic tile backsplash. Many people first think of getting a lovely kitchen backsplash tile, but it can also look great in bathrooms and laundry rooms.
2. Be Creative
With a project such as a mosaic tile backsplash, it's essential to get as creative as you want! You can choose kitchen backsplash tile or a subway tile backsplash. In fact, kitchen mosaic tile backsplashes are a popular choice for many homeowners because of how convenient it is to have a great view right at your fingertips when cooking.
3. Be Bold
Don't be afraid to go big! Mosaic kitchen backsplash tiles are a great way to make your kitchen stand out. Remember that the most important thing is that you love it, not what anyone else thinks or says about your kitchen design. You can always repaint if necessary at some point down the line!
4. Think About the Aesthetics
Think about what type of kitchen backsplash tile will go best with your kitchen decor if you put your backsplash in the kitchen. If you want to give your kitchen a modern look, a subway tile backsplash or glass mosaic kitchen backsplash could be perfect for you!
5. Think About the Maintenance
Keep in mind that a mosaic tile backsplash doesn't come without its downsides. If you choose a more porous mosaic tile backsplash, it will be harder to clean and maintain as opposed to kitchen tiles made of glass or ceramic materials. Plan accordingly!
6. Take Your Time
If you are working on a kitchen backsplash tile project, be sure that you take your time. This will help ensure that the selection and installation process goes smoothly and give you better results in the end! Do not rush things like this since doing so can result in poor-quality kitchen backsplash tile.
7. Make a Plan
If you have never installed kitchen backsplash tiles before, it is crucial to carefully plan out what needs to be done. The kitchen will probably need a thorough cleaning, and then the kitchen mosaic tile should go down on top of that. You can also add some grout in between your tiles.
Things to Know Before You Start
A tile backsplash typically covers the area between the countertop and upper cabinets, but in some cases, it makes sense to extend the backsplash area beyond the counter. When you do this, it's important to create a stable, temporary bottom edge to hold the tiles in a straight line.
Do You Need to Install Cement Backerboard?
When installing ceramic tile on the floor or a countertop, some type of backing material, such as cement board or an uncoupling membrane, is essential because it provides extra reinforcement and a flat surface that prevents cracking. Builders also use cement board when tiling walls and ceilings in very wet areas, like showers.
How to Install a Tile Backsplash
Use a tape measure to measure the lengths and widths of all parts of the wall that constitute the backsplash and calculate the area. Divide that by the area of each tile you plan to use to get the number of tiles you need. Add a 10-percent overage to account for cutting waste and mistakes.
Tile Backsplash Maintenance
A tile backsplash needs regular cleaning, especially the parts near the stove and food preparation areas where oils and greases are likely to fly around, but it's simple.
Measure Wall
The square footage determines how much tile is necessary for tiling a backsplash in a kitchen. Proper measurements will help keep tile installation costs down.
Prep Workspace
Remove all appliances and cookware from your countertop before you start to tile a backsplash. You may need to move the stove slightly away from the wall so you can easily place tile behind it. Disconnect the stove for added safety.
Prep Wall
Patch any holes with spackling paste and use sandpaper to lightly smooth the surface of your work area.
Pre-Lay Tile
Place the tile across the wall and mark your starting and end points. Your starting point depends on the most viewable area of the wall.
Prepare Mortar
To prepare powdered thin-set mortar for natural stone and mosaic tile, fill your bucket with water in the amount listed on the package. Gradually add the thin-set powder, mixing it thoroughly.
Apply Mortar
Begin with a 2-foot section. Apply the mortar to the wall, spreading a thin layer with the flat side of the trowel .
Lay Tile
Place the mosaic sheets or tiles along the wall. Add tile spacers for help keeping the tile pieces lined up. Follow the lines you made when the tiles were dry fit to the wall.
