How to take a silhouette?
What aperture do you use for sunburst?
About this website

How to take silhouettes?
The first and most important rule for shooting a silhouette is to have a strong source of light. To take a great silhouette, you’ll need the light source BEHIND your subject. The most obvious choice is to use the sun, which is why you’ll see most silhouette images being taken outside. You’ll also need to be mindful of the position of the sun. Sunsets, therefore, are some of the best times to shoot a silhouette as the sun is LOW in the sky and easy to position behind your subject. It is harder to shoot a silhouette at midday because the sun is HIGH in the sky (unless you’re planning on shooting upwards!). Of course, you can shoot a silhouette anywhere, at any time of day, as long as you have a strong light source behind your subject but if you want a quick and easy result then going to the beach at sunset is your best bet.
What aperture do you use for sunburst?
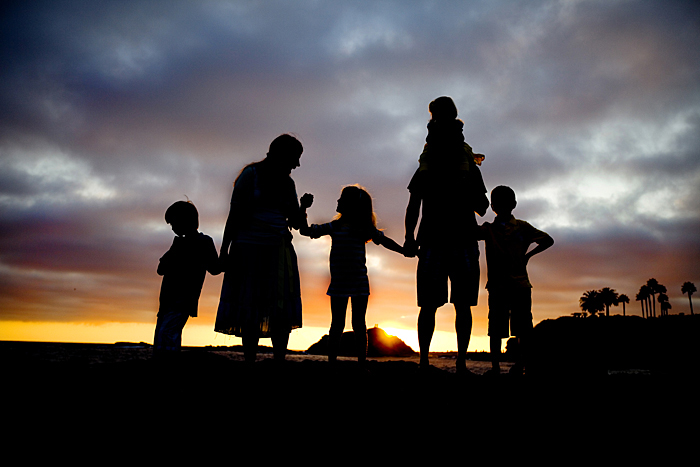
If you change your aperture settings then you can create different effects. The ‘sunburst’ in the image above is created using a small aperture (f16). It’s fun to experiment with different aperture sizes to see the different looks you can create. Try a large aperture for a more blurry/hazy background.
What to consider when shooting at the beach?
It may be obvious, but it’s important to consider the weather and tides when planning a beach shoot. It’s not ideal to be shooting in wet and miserable conditions, so make sure you check the forecast before leaving home. Equally, when planning a shoot at the beach, make sure that you’ve checked the tide tables to ensure that you have a safe environment to shoot in. You’ll also need to think about protecting your gear at the beach from the salt water and sand.
1. Light Source
The first and most important rule for shooting a silhouette is to have a strong source of light. To take a great silhouette, you’ll need the light source BEHIND your subject. The most obvious choice is to use the sun, which is why you’ll see most silhouette images being taken outside. You’ll also need to be mindful of the position of the sun.
2. Background
You’ll need to find a light, clear, uncluttered background for your image. This is necessary in order to be able to see the OUTLINE of your shape clearly. A large section of open sky is the easiest option and that is why shooting silhouettes at the beach is very popular.
3. Vision and direction
Think about the image that you’d like to create BEFORE the shoot. It’s helpful to have a few different ideas to experiment with and see what works. I love to capture connection in my images and so always make sure that my subjects are interacting in some way. It adds to the emotional impact of the final image.
5. Change your aperture
If you change your aperture settings then you can create different effects. The ‘sunburst’ in the image above is created using a small aperture (f16). It’s fun to experiment with different aperture sizes to see the different looks you can create. Try a large aperture for a more blurry/hazy background.
6. Shoot Low
I always shoot my silhouette images from a very low angle. I do this to make sure that I’m getting as much as I can of my subject in the frame. If you shoot from a higher angle, for example, you can often end up with legs and feet merging into the floor and losing definition.
7. Underexpose
Use your exposure compensation dial to underexpose your image. If you’ve no idea what I’m talking about then check your manual for instructions. It’s a very simple, effective technique and it will make sure that your silhouette is dark.
About the Author
Gemma Griffiths a family and commercial photographer based in the Vale of Glamorgan in Wales, UK. You can find out more about Gemma on her website and follow her work on Facebook and Instagram. This article was also published here and shared with permission.
What Gear to Use?
Most of the time, all you really need (but still optional!) to capture beach silhouettes is a full frame camera, a few good lenses, and a tripod.
The Subject
The subject is the basis of your silhouette and it needs to be strong.
Lighting
How you manipulate lighting will make or break your silhouette. There are many ways to overexpose your subject so we have to make sure that we focus on getting the lighting just right.
Exposure Settings
You have arrived early, you have your equipment ready, and your subject is in place.
Post-Processing
After our silhouette session, we may have a few pictures where our subject is slightly visible and could use some darkening.
About the Author
Christi Pennington is a professional photographer in Destin, FL. She specializes in all things beach photography. Her passion for photography stems from her sister’s work in a busy portrait studio in Atlanta, GA. There, she learned the basics of photography on a Canon Film SLR.
Why do you need to take silhouette pictures?
If you’re interested in taking pictures with a bit of mystery and drama, you need to learn how to take silhouette photos. Silhouette photography is great for adding a certain moody mysteriousness to your portfolio. By taking pictures of your subject in front of a light background to create a silhouette, you facilitate a deeper connection within your image.
What lens do you use for silhouette photography?
For silhouette photos, the lens isn’t that important. But it could be helpful to use a fixed prime lens between 35mm and 50mm. These lenses are sufficient in capturing light even if your eyes can’t see it.
What is the best silhouette photo?
The best silhouette photos involve space, definition, and separation. All your subjects should be clearly visible as bold silhouettes against a vast background. Silhouette photos look better in open spaces, where you can create a dramatic background. You almost always want to shoot either at the beginning of the day or at the end when the sun is at its lowest point.
How to get a silhouette effect?
Since you’re probably shooting silhouette photos at either dawn or dusk, you can get a greater silhouette effect by hiding the sun behind your subject. Let’s say for example you’re shooting on a beach while the sun is setting over the water. Have your subject stand directly in front of the sun for a perfect silhouette.
What happens if you don't hide the sun?
If you don’t hide the sun, you could experience issues like lens flare or large white spots in your photos. Remember that the sun is pretty bright, so if it’s not hidden, your camera sensor is getting an overload of light. Plus, we’re talking about silhouettes. The best silhouette is with your target blocking the main bulk of light.
Why do silhouettes have a background?
The reason for this is that too many things in the photograph can be distracting. You don’t want cars and trees and buildings taking attention away from your subject. Somewhere flat, somewhere along the ocean, or somewhere without a lot of interference. This ensures that your main subject is the focus of the silhouette photo, with a great open background behind them. It’s just more dramatic this way.
Why do you shoot at low angles?
Low angles also allow you to get a better shot of the surroundings with your subject. You can incorporate the clouds, the beach, or wherever you may be shooting. You’ll get a larger panorama, with your silhouetted subject dominating the shot.
What is the difference between a silhouette and a sunset?
Silhouettes are indeed pictures of contrast but what sets them apart from other types of photos such as sunset photos are the lack of detail in objects -- people, sailboats, piers, birds and palm trees -- offering no information or detail beyond shape. Faces are dark and not visible, nor are other objects.
What is silhouette photograph?
The official dictionary definitions are too simplistic to explain what a silhouette photograph is but here's what they say: "a dark shape in front of a light background".
Where to take silhouette pictures?
One of the easiest places to take silhouette pictures is California beaches with piers and flat, sandy landscapes, or cliffs and mountain tops.
What does a light meter do?
A light meter reading will help you determine if you have the correct setting to create a silhouette. Around sunset when the sun is low in the sky be sure to turn off any automatic flash fill. Did we tell you that you will need a camera that allows you to control the flash? Most do.
Which state has the best beaches for people watching?
California's busiest beaches offer some of the best people watching. minutes ago
Can natural light create silhouettes?
Sometimes you will simply "luck" into them but if you work with natural light you usually can create a silhouette photo.
Do beach sports photographers make a living?
Most beach sports photographers don't make a full time living in the trade, but they do have fun. Some of the best surf photographers, for instance, are surfers, themselves.
What is silhouette photography?
A silhouette is a solid, dark image of a subject against a brighter background. Silhouette pictures usually show the subject in profile. The first silhouettes originated in 1850s France as a cheaper alternative to having a portrait painted. These silhouettes were paintings, sketches, and paper cutouts. Silhouettes are still with us, but today they’re more likely to be made with cameras than with heavy paper.
What does partial silhouette mean?
A partial silhouette can suggest a certain amount of mystery or make it seem like a person is partially shrouded in darkness or emerging from shadows. While both perfect and partial silhouettes can benefit from post-production, partial silhouettes in particular need more help to achieve the desired effect.
How to take a silhouette photo?
An easy way to “trick” your camera into taking a silhouette photo is to expose it to a bright light source like the sky , and then very quickly snap a picture of your subject. “You want to expose your camera for the sky,” says Budd. “Since the subject will be backlit, they’ll be dark.”
Why are silhouettes used in landscape photography?
If you take a photo of a major landmark and want to show people in relation to it, a shot of silhouetted figures instead of fully lit figures can give a sense of human scale and provide a blank space for viewers to place themselves.
What does a faster shutter speed do?
With a faster shutter speed, a camera can let in light from a bright source like a blue sky, sunset, or studio lighting. But it won’t have the opportunity to let in the lesser amount of light on the backlit subject. The background will be bright and visible, and the subject will be in silhouette.
How to make a subject darker?
Another way to make the subject darker is to increase shutter speed. The longer a camera’s shutter is open, the more light gets in. With a faster shutter speed, a camera can let in light from a bright source like a blue sky, sunset, or studio lighting. But it won’t have the opportunity to let in the lesser amount of light on the backlit subject. The background will be bright and visible, and the subject will be in silhouette.
How to get a silhouette with a bright background?
Sometimes the best way to get an image of a perfectly dark silhouette and bright background is to combine two images or to correct an image in post-production. Bracketing in photography refers to taking several pictures of the same subject with different camera settings. With silhouette photography, combining different images of the background and subject can yield the bright background and dark subject you’re looking for.
What is spot metering on a camera?
Spot metering puts the exposure meter on the central part of your frame – so you can accurately tell your camera the exact portion of bright background you want to use to set the exposure.
What to do if your subject is too light?
If your subject is too light (i.e., you need to make it darker), increase the shutter speed and see what happens. And if your subject is too dark, decrease the shutter speed to brighten up the shot.
What does auto mode do on a camera?
You see, Auto mode generally determines the exposure levels when you push the shutter button halfway down (at the same time that the camera focuses).
How to make a picture black?
Place your subject (the shape you want to be blacked out) in front of a light source. Then force your camera to set its exposure based on the brightest part of your picture (i.e., the background). In doing this, your subject will be underexposed. It should turn very dark and sometimes even black.
Why are silhouettes so popular?
Silhouettes are a wonderful way to convey drama, mystery, emotion, and mood. They often stand out thanks to their simplicity as well as the story that they convey.
What is the best background for a photo?
The best backgrounds are often a bright, cloudless sky with a setting sun.
What aperture do I need for a camera?
For this, you’ll need to set a small aperture (i.e., a large f-number, such as f/11 or f/16) to increase the depth of field. If the f-number is large enough, and your subject isn’t too close to the camera, you’ll end up with both a sharp subject and a sharp background, even if your camera is focused on the area behind your subject.
How to take a silhouette?
To take a great silhouette, you’ll need the light source behind your subject. The most obvious choice is to use the sun, which is why you’ll see most silhouette images being taken outside.
What aperture do you use for sunburst?
If you change your aperture settings then you can create different effects. The ‘sunburst’ in the image above is created using a small aperture (f16). It’s fun to experiment with different aperture sizes to see the different looks you can create. Try a large aperture for a more blurry/hazy background.
Summary of Topics
- What Gear to Use?
- Composition
- The Subject
- Lighting
What Gear to use?
- Most of the time, all you really need (but still optional!) to capture beach silhouettes is a full frame camera, a few good lenses, and a tripod.
Composition
- (rule of thirds, isolate your subject, take pictures from below, rule of space (direction your subject is moving)) Besides lighting, the composition may be the most important factor for taking superb sunset beach silhouettes. Let’s say you managed to capture a perfect silhouette of your subject. Uh oh… There are some random figures in the backgroun...
The Subject
- The subject is the basis of your silhouette and it needs to be strong. Here are some important things to consider about your subject: If you have multiple subjects, avoid having them too close together as they will appear as one massive blob, completely nullifying your efforts. The placement of the subject is important. We need to place the subject in front of some light sourc…
Lighting
- How you manipulate lighting will make or break your silhouette. There are many ways to overexpose your subject so we have to make sure that we focus on getting the lighting just right. Depending on where you live, you have more or less time to get your shot before darkness arrives. The sun sets around the same time for everyone during the March solstice. If you live in Florida, …
Exposure Settings
- You have arrived early, you have your equipment ready, and your subject is in place. Now what? Get those exposure settings right! What all is involved here? Let’s break it down. 1. Manual Mode 2. ISO 3. Shutter Speed 4. Aperture 5. Metering 6. Shooting in RAW
Bracketing
- Bracketing is such a useful tool for capturing a silhouette. With bracketing, your camera will take around 3 pictures. 1st picture is the one you metered for. 2nd picture is one stop over what you metered for. 3rd picture is one stop under what you metered for. Bracketing really comes in handy when you are not quite sure what your exposure settings should be, so you can get a nice sampl…
Post-Processing
- After our silhouette session, we may have a few pictures where our subject is slightly visible and could use some darkening. We can do this with one or two layer adjustments. Utilize a layer adjustment and move the black slider to the right to darken the shadows Move the white slider to the left to brighten your sky Increasing your saturation and liveliness can also add more detail t…
About The Author
- Christi Pennington is a professional photographer in Destin, FL. She specializes in all things beach photography. Her passion for photography stems from her sister’s work in a busy portrait studio in Atlanta, GA. There, she learned the basics of photography on a Canon Film SLR. She is also a wife and the mother of two wonderful children who she spares no expense in photographing constan…