
Crown Molding Cutting Tool Guide
- Hand Saw. Unfortunately, cutting crown molding with a hand saw is more or less impossible. ...
- Table Saw. The average table saw contains everything required to cut crown molding. ...
- Miter Saw. There are many different types of miter saws, each with a different specialized purpose. ...
- Compound Miter Saw. ...
Full Answer
What is the best tool for cutting crown molding?
- Crown-Cut crown molding cutting jig.
- The safest and easiest way to cut crown molding.
- Eliminates trial and error.
- Made from durable polymer in the USA.
- Fits all 10" and larger miter saws.
What is the best saw for crown molding?
Top 10 Best Miter Saws For Crown Molding 2022
- NXPOXS Replacement DW7084 Crown Moulding Stop for DEWALT Miter Saw DW703. ...
- Bench Dog 10-027 Polymer Crown-Cut Crown Molding Cutting Jig. Crown-Cut crown molding cutting jig. ...
- DEWALT Miter Saw Crown Stops (DW7084)
What is the best nail gun for crown molding?
- Finish nailer ( shoot 15-16 gauge nails )- it is the strongest nailer and shoots the biggest nails. Excellent choice for crown molding.
- Brad nailer ( shoot 18 gauge nails )- it is also a strong nailer but weaker than the finish nailers. ...
- Pin nailer ( shoot 23 gauge nails )- it is the thinnest and weakest of all nailers. ...
How to cut crown molding outside corners for beginners?
Part 2 Part 2 of 2: Making Your Cuts Download Article
- Mark each piece of molding to the correct length. Measure the length of the wall on the left-hand side from the inside corner to the outside corner.
- Cut one piece of crown molding. Position a piece of crown molding so it’s flat beneath the blade of the miter saw.
- Make an opposing miter cut on the other piece of crown molding. ...
- Install both pieces. ...
What tools do I need make crown molding?
Tools Needed The two basic tools you need for cutting crown molding are a miter saw and a coping saw. The miter saw is used for cutting scarf joints. This is a joint that connects two lengths where one length of crown molding is not long enough to cover the entire area you are working on.
What kind of saw do I need for crown molding?
power miter sawA power miter saw is the best way to cut crown moulding once you measure the angles. The saw can be adjusted to cut at any angle – set it to 45 degrees for one side of a standard 90-degree corner. The saw can be set to 45 degrees to the left or 45 degrees to the right.
Is crown molding hard to install?
Compared to wood, foam crown molding is not only affordable and easy to install, but it's also pliable—making it easy to work with around the curvatures of your home.
How do you cut crown molding for dummies?
2:429:46How to cut crown molding the easy way! - YouTubeYouTubeStart of suggested clipEnd of suggested clipIt's an inside cut. It's very simple all you do is mark your piece of wood if you have any troubleMoreIt's an inside cut. It's very simple all you do is mark your piece of wood if you have any trouble remembering once you do it a few times it becomes second nature but right now just mark your wood.
What is the easiest way to install crown molding?
1:022:15The easiest crown molding you will ever install. Mount to the ... - YouTubeYouTubeStart of suggested clipEnd of suggested clipApply a bead of painters caulk on the top edge of the crown molding that meets the ceiling. AfterMoreApply a bead of painters caulk on the top edge of the crown molding that meets the ceiling. After applying the caulk to the back of the crown molding. You can install it to the wall and the ceiling.
How much should I pay for crown molding installation?
To have a professional install crown molding, expect to pay between $4 and $15 per linear foot for materials and labor. A single room costs anywhere from $300 to $800, while a whole house installation costs between $3,200 and $12,000.
What is the average price to install crown molding?
Written by HomeAdvisor. The average cost to install crown molding is around $1,227, with average room costs ranging from $572 and $1,895. The cost of labor and materials is about $4 to $23 per linear foot. High-end materials, like exotic woods or metal, and custom installations can drive the price.
Can I put crown molding myself?
Crown molding is an inexpensive and easy way to add visual interest and value to your home. With just a few tools and basic carpentry knowledge, you can achieve a stylish upgrade within any space.
What kind of miter saw Do I need to cut crown molding?
1:194:37Using a Miter Saw to Cut Crown Molding - YouTubeYouTubeStart of suggested clipEnd of suggested clipSaw is too short and you don't have a jig to hold it in place well the good news is that's exactlyMoreSaw is too short and you don't have a jig to hold it in place well the good news is that's exactly the problem that these compound miter saws are designed to fix.
Can I cut crown molding with a circular saw?
If you don't have any other type of a saw available, you can cut molding using a circular saw and a speed square. This handy tool clamps to the end of any piece of molding to cut accurate 45- or 90-degree angles when installing molding, reveals BarelyBad.com.
Can you install crown molding without a miter saw?
By using special trim pieces called corner blocks, a clean, straight cut on both ends of the crown molding is all that's required, resulting in an installation with a custom, detailed look.
Can you cut crown molding with a hand saw?
Use a coping saw to fit crown molding in inside corners that aren't square. Start by cutting the end of one piece of molding at a 90-degree angle and nailing it in place with that end flush against the wall.
What is a compound miter saw?
A compound miter saw gives you all of the features of a miter saw, but allows you to change the height of the blade to make bevel cuts. Compound miter saws are ideal for cutting crown molding. While purchasing one specifically for cutting your crown molding might be going a little bit overboard, compound miter saws are definitely the tool of choice for this job if you can get a hold of one.
Can you cut crown molding with a hand saw?
Unfortunately, cutting crown molding with a hand saw is more or less impossible. Hand saws simply do not have the accuracy to cut the precise angles needed for crown molding cutting. This is particularly true when you consider that whatever you choose to cut your molding must be able to produce the exact same angle many times. If you need to cut molding, but only have access to a hand saw, you will simply need to borrow, rent or purchase a more appropriate tool.
Can you use a table saw to cut crown molding?
In fact, the table saw itself is less than ideal for crown molding cutting. While it can do the job acceptably, it is not specifically designed to cut the miter joints that molding requires. If you only have access to a table saw, you can use one to cut your crown molding. However, if you have access to a miter saw, you are better off choosing it as your tool. In fact, if you can borrow or even rent a miter saw, you will not regret it.
What is the best nail gun for crown molding?
Of the many available choices, the best nail gun for crown molding is the 16G finish nailer. The 16-gauge nails have sufficient holding power to secure the molding in place, yet the nail holes are small enough to hide.
What is crown molding?
The definition of crown molding is basically a decorative mold formed from a cornice that is installed at the top of an interior wall where it connects to the ceiling. This decorative molding is called “crown” because it sits atop the wall much like a crown sits atop the head.
Why is a finish nailer the perfect size for crown molding?
The finish nailer Is the perfect size because it allows you to get into the smaller, tighter areas that a framing nailer may not allow. But more importantly, the finish nails that are used are small enough to not be noticed while large enough to secure the crown molding. However, in some cases, if the nail is driven a little too deep the hole can be puttied over and then painted.
How thick is crown molding backing?
The normal thickness of the backing strip can be from 1/16 th to ½” which depends in large part on the appearance you want for the crown molding. When installing, you want to ensure that the backing strip does not come in contact with the back of the crown. Otherwise, it will prevent the flanges from coming into contact with the ceiling and wall. So, make sure that there is a small gap of approximately 1/16 to 1/8 inches between the molding and the backing surface to which it is attached.
Why hangers on molding?
The hangers not only provide an extra pair of hands in supporting the molding but will also let you test and see how it looks before you make the cut.
What is a backing strip for crown molding?
A backing strip is exactly as it sounds, a thin strip of wood (usually softwood or plywood) that is placed behind the crown molding before it is installed . The backer strip provides a secure surface to rest the crown molding. This also means you will not have to search for studs and can use shorter nails.
What is a 16 GA nailer?
The 16 GA finish nailer is designed for small projects such as securing crown molding. However, it is also well-suited to secure the following.
What material is used for crown molding?
Composite materials such as PVC, polyurethane, Styrofoam, rubber, or flex are commonly used in modern crown moldings. They’re light, flexible, and simple to set up. It’s difficult to trace them separately once you’ve painted them. They’re also less likely to soak up moisture, making them ideal for bathroom and outdoor use. You will get more ideas on crown molding materials by clicking here.
Why do we use crown molding?
We see crown moldings are being used to bring a sophisticated feel to a furnished space, add style and narrow the gap in a room with a high ceiling. Not only does it function to transform the beauty of old houses, but it also works to transform the grace of modern homes into a classy, elegant, and vintage look according to your personality.
What Size Nail Gun For Crown Molding?
Except for plaster, you’ll need to use either nails or glue or both to fasten all of the above-mentioned crown moldings with its baseboard. When you will need to fasten nails, you have to take the help of either a hammer or a nail gun. If you choose a hammer, chances are there the nails may pound incorrectly, causing harm to the delicate molding. You may also injure your finger if you are a beginner in this field.
What gauge nails do carpenters use?
One thing is certain: finishing carpentry will necessitate the use of 15 or 16, 18, and 23 gauge nails and nail guns. Professional carpenters try to collect all of the variations in order to complete their work appropriately. However, choosing one or two among them can be difficult for DIY enthusiasts and homeowners. There’s no need to be concerned. Allow us to perform the scut work for you.
What is a brad nailer?
The brad nailer is the smaller of the two nail guns discussed previously. It’s also great for fragile crown moldings because it’s designed to drive 18 gauge nails up to 2 inches long. Brads are usually thin enough to penetrate through the moldings yet powerful enough to hold them in place over time.
What is nail gauge?
Here, the nail gauge refers to the cross-sectional diameter of nails and is the most important factor in nail gun selection.
What is MDF crown molding made of?
MDF (medium-density fiberboard), which is made of sawdust and resin, is another DIY-friendly crown molding material. Due to its smooth finish and strength, MDF has been a popular crown molding material among do-it-yourselfers and professionals. Furthermore, it is inexpensive and, when painted, resembles wood molding. Light MDF crown molding, unlike natural wood, is prone to dents and scratches if not used properly.
What is the easiest type of crown molding to install?
The less expensive types of crown molding—PVC, polyurethane, and polyethylene—are easiest to install. Successful installation of MDF or wood crown molding requires intermediate carpentry skills.
What can carpenters do with crown molding?
Finish carpenters can create large cornices by combining crown molding with additional types of molding, such as baseboard, bead board, cove and other types of trim to produce an imposing custom look. Photo: istockphoto.com.
What is crown molding?
In generic terms, today’s crown molding is any horizontal trim that separates the walls from the ceiling or adorns the tops of other architectural elements, such as door casings and cabinets. More specifically, crown molding is the term for a particular trim shape contoured to fit at an angle between the wall and ceiling .
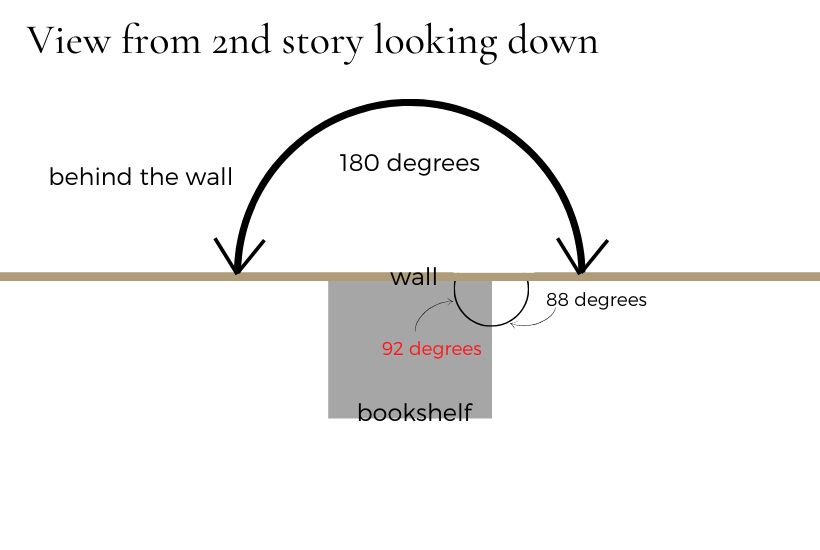
How to cut corners of molding?
For an inside corner, measure to the corner and transfer the measurement to the back side of the molding; then make a 45-degree cut to create an angle where the back side is longer than the front side. For an outside corner, transfer the measurement to the front side of the trim and cut the angle in the opposite direction to create a 45-degree angle with the front edge as the longest point. For best results, follow the old carpenter adage: Measure twice, cut once!
How does crown molding attach to the ceiling?
Wood crown molding attaches with finish nails or finish screws to both the ceiling plate and to the wall studs. If you’re having oversize crown molding installed, your carpenter may have to install additional blocking in the ceiling to support the weight of your ornate decorative accent.
How much does crown molding cost?
Simple wood crown starts around $1 per foot for plain pine and goes up in price depending on size and ornateness. You could pay as much as $30 a foot for large hardwood crown molding that features elaborate milled designs.
How to make a 45 degree miter?
Start by making 45-degree miter joints on both inside and outside corners. (A miter joint is a joint where the ends of two separate pieces are cut on an angle and fitted together.) Use a miter saw or a hand-held coping saw to create sharp, precise cuts.
Plan Your Installation
Learning how to install crown moulding starts with careful planning. The moulding pieces need to fit seamlessly around your room. The first thing to do is determine which crown moulding to use. There are a number of different decorative styles that you can install based on the decor of your room.
Measure the Room and Mark Studs
Each piece of crown moulding will need to be custom fitted to your wall and each other. No room is perfectly square, so measuring accurately is essential. You’ll also want to nail the crown moulding into a stud for a secure hang.
Measure and Mark Moulding
Put the moulding against a framing square, noting the distance between the face of the moulding edge and the corner.
Set Up the Miter Saw
When first learning how to cut crown moulding, position the moulding correctly on the saw.
Cut Crown Moulding
Part of learning how to install crown moulding is figuring out which cut to use. You will make inside corner cuts, outside corner cuts and sometimes scarf joint cuts. The most common types of crown moulding cuts are:
Test and Trim to Fit
You want your cuts to fit snugly together. As you cut each piece of moulding, look closely at each one. See if there is the excess wood beneath the profile. Cut away any excess with a coping saw.
Installing Crown Moulding
Once you’re sure the joints fit, you’re ready to install the crown moulding.
