This is a genuine Aqualisa replacement shower head holder. It can be fitted in less than 5 minutes. Simply remove the lower bracket of the shower rail, slide off the old holder (and soap dish and shower hose holder) and slide on the new bracket, soap dish and hose holder and refit lower bracket.
Full Answer
How to install Aqualisa shower head?
How to install Aqualisa bath filler?
How to fix a shower control?
How does Aqualisa shower work?
How to fix a quartz diverter?
How to connect a bath waste to a blended supply pipe?
How to connect a quartz valve to a diverter?
See 2 more
How do you fit an Aqualisa shower?
0:592:01How to install an Aqualisa Q™ concealed smart shower controllerYouTubeStart of suggested clipEnd of suggested clipBit remove the paper liner on the gasket. Apply a silicon adhesive into the channel of the wallMoreBit remove the paper liner on the gasket. Apply a silicon adhesive into the channel of the wall plate and push onto the wall fix. The back plate to the wall with supplied. Screws.
How do you fit an Aqualisa smart valve?
0:192:40How To Install An Aqualisa Quartz Smart Valve For ... - YouTubeYouTubeStart of suggested clipEnd of suggested clipPlace the court smart valve on a solid mounting surface and fix the feet into position prepare. AndMorePlace the court smart valve on a solid mounting surface and fix the feet into position prepare. And connect the pipe for the mix water outlet to the proposed site in for the shower outlet.
How do you install Aqualisa shower rail?
0:122:47How To Install An Aqualisa Rail Kit - YouTubeYouTubeStart of suggested clipEnd of suggested clipFit the spacer and referring on to the projecting. Pipe. Ensuring the locking screw holdersMoreFit the spacer and referring on to the projecting. Pipe. Ensuring the locking screw holders positioned at the bottom place. The wall outlet mounting plate onto the pipe assembly.
How do you install Aqualisa shower head?
0:121:30How To Install An Aqualisa Wall Mounted Easyfit Fixed HeadYouTubeStart of suggested clipEnd of suggested clipSlide the spacer onto the projecting pipe flush with the finished surface ensure. The pipe is cleanMoreSlide the spacer onto the projecting pipe flush with the finished surface ensure. The pipe is clean and free of dust. And slide the fixing bush onto the pipe flush with the wall spacer.
Will my Aqualisa shower work with a combi boiler?
The Aqualisa 609 shower has a variant for both combi boiler and gravity fed water systems and can be used in conjunction with a pump in the event that you have poor water flow.
What is an Aqualisa smart valve?
AQUALISA Smart Valve The unique Aqualisa SmartValveTM thermostatically blends the water ensuring that the flow from the shower heads is constantly the correct temperature.
How easy is it to install a shower over a bath?
Fitting an electric shower is not impossible but you will probably have to surface mount the pipe (you might be able feed the shower cable through the cavity). If you have a Combi or unvented hot water cylinder, you could fit a thermostatic mixer.
How do you remove a Aqualisa shower riser rail?
if the rail needs to be removed at any stage, insert the special tool provided into the rear of the bottom rail bracket to disengage the rail locking tab. Carefully ease the rail up and away from the fixing bracket. Pass the hose through the gel hook.
How hard is it to install a shower?
The truth is that installing a shower isn't that complicated, and you can save a lot of money by doing it yourself. You shouldn't need to make any alterations to your plumbing to complete the job, and most of the tools you need will be provided in your new shower kit.
How do you install a wall mounted shower arm?
2:064:16How to Change a Shower Arm - YouTubeYouTubeStart of suggested clipEnd of suggested clipAnd when you put it on you want to wrap it so it wraps around clockwise. And as you do this you wantMoreAnd when you put it on you want to wrap it so it wraps around clockwise. And as you do this you want to put you have to put as much on as you did put it into the wall.
How do I remove Aqualisa thermostatic shower?
2:419:34How to replace an Aqualisa thermostatic mixer cartridge.YouTubeStart of suggested clipEnd of suggested clipAnd it's really just unscrewing the cartridge. It's always a good policy to unscrew the cartridgeMoreAnd it's really just unscrewing the cartridge. It's always a good policy to unscrew the cartridge equally so you don't you unload unload it off the valve. Um roughly and out comes the cartridge.
Why does my Aqualisa shower keep going cold?
1 That the main valve coming into your house is fully open. 2 Then check that the valve on the line to the shower is fully open. The other possibility is a faulty flow/stabilizer valve not allowing the correct amount of water into the shower.
What is a Aqualisa Digital Diverter?
Aqualisa's Digital Diverter Processor is an addition that is suitable for a range of Aqualisa Showers, perfect for replacing an existing processor so you can make sure your shower from Aqualisa is kept to a high standard.
How do you remove Aqualisa shower control?
Electric showers: Ceiling and wall mounted Fixed heads Aqualisa fixed shower heads have a basic threaded connection and simply unscrew from the fixed arm. Looking up at the spray plate, turn the head anti-clockwise to remove it.
What does the boost button do on a Aqualisa shower?
Press the 'Boost' on the controller to increase the flow of the shower when desired. To turn 'Boost' off, press the 'Boost' button again at any time. N.B. The strength of the 'Boost' button will vary depending on the water system pressure and the configuration of the pipework.
What type of shower is Aqualisa quartz?
Electric showersA versatile, family-friendly collection of Digital, Thermo and Electric showers, the Aqualisa Quartz Shower Collection has it all. These sleek Aqualisa Showers are easy to install and use and effortlessly create a soothing showering experience.
Aqualisa Installation Guides | Shower Installation | Aqualisa
Find product information and technical details on your Aqualisa Shower, including help on shower installation.
Aqualisa Smart Shower Installation Guide - Plumbworld
Aqualisa Smart Shower Installation Guide - Plumbworld
Frequently Asked Questions | Aqualisa FAQ | Aqualisa
Aqualisa showers are designed to work on the following high pressure water systems: Combi boiler systems (must have a minimum rating of 24KW / 80,000 BTU and have a fully modulating gas valve)
How to install Aqualisa shower head?
In this video I'll be showing you how to install an Aqualisa easy fit wall mounted fixed head. Cut the outlet pipe to length 55 to 150 millimetres measured from the finished wall surface. Slide the spacer onto the projecting pipe flush with the finished surface. Ensure the pipe is clean and free of dust and slide the fixing bush onto the pipe flush with the wall spacer. Fit the 15-millimetre O-ring against the end of the fixing bush mark the four fixing points. Slide the fixed head arm over the fixing bush flush with the wall surface. Carefully remove the fixed head arm drill and prepare the fixings, take care to avoid pipe work hidden in the wall. Refit the shower arm and secure it to the wall using the screws provided.
How to install Aqualisa bath filler?
Carefully, unscrew and remove the bath waste clicker assembly from the waste body and set aside. Unscrew and remove the overflow filler outlet from the body assembly and set a side. Offer the outlet body assembly into position at the rear of the bath, ensuring the rubber washer is aligned past the overflow filler outlet through the bath and secured to the body assembly .
How to fix a shower control?
Holding the wall plate on the wall in the desired location for the shower control mark fixing points. Drill and prepare the wall fixings for the controller using the fixings provided. Ensure the data cable is held securely by the narrow middle slot of the mounting plate and fixed to the wall using the screws provided.Flip the data cable into the rear of the controller and slide onto the mounting plate.
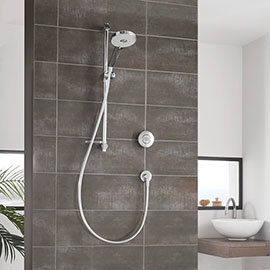
How does Aqualisa shower work?
A smart shower works by separating the valve from the control. The beauty of this is a simpler and more flexible installation. Allowing the box can be sited up to 10 metres away from the shower itself. For example, the smart valve can be sited in the loft, an airing cupboard, or even under the bath just remember this must be accessible for future services.
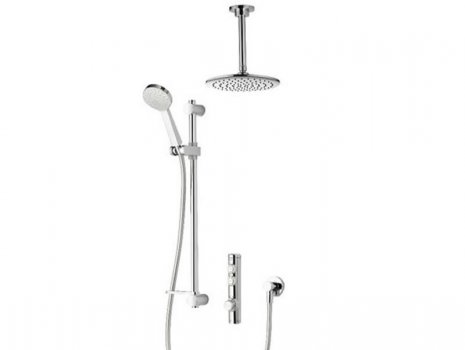
How to fix a quartz diverter?
Fix the diverter into place using the adjustable feet. Connect the blended supply pipes from the diverter to the bathroom feeds. Remove the lids from the diverter and the Quartz valve. Connect the 2 meter patch lead cable from the secondary port of the Quartz valve and the first port of the diverter. Replace the lid to the smart valve and diverter and secure using the fixing screws. Ensure that all isolation valves are fully open.
How to connect a bath waste to a blended supply pipe?
Offer the bath waste into position ensuring the rubber washer is correctly aligned between the waste assembly in the bath base. Pass the bath waste clicker through the bath and secure to the waste body assembly. Connect the bath waste to a suitable waste pipe.
How to connect a quartz valve to a diverter?
There are two possible wiring configurations. For Visage, Viso, and Zuri the main controller cable plugs into the diverter. Connect the 2-meter patch lead cable from the secondary port to the diverter and the first port of the Quartz valve.
What is the phone number for Aqualisa shower heads?
If at any stage during installation you have any questions then please contact the Aqualisa Customer Service Department on 01959 560010 for advice.
How to install Aqualisa SmartValve?
Place the Aqualisa SmartValve™ and diverter (where supplied) on a solid mounting surface, and place the fixing feet into suitable positions. Mark, then drill and prepare suitable fixings securing to the mounting surface using the screws provided (if suitable). Choose the position for your Aqualisa SmartValve™ and diverter (where supplied) as close to the controller as possible. These may be sited in the roof space above the proposed shower site, in the airing cupboard or behind a screwed bath panel if more convenient. For information regarding protecting the Aqualisa SmartValve™ and diverter (where supplied) from cold/frost, contact Aqualisa Customer Services or refer to the Aqualisa website. Insulation material must not be placed under or on top of the Aqualisa SmartValve™ and diverter (where supplied), the location should be where freezing cannot occur. Please refer to the system layout diagrams. Exposed installation example shown
How much static pressure does Aqualisa have?
The pumped Aqualisa SmartValve™ shower system is designed to operate up to a maximum static pressure of 100kPa ((1 bar)(10 metres head)(14.5psi)). Under no circumstances must the pumped Aqualisa SmartValve™ be connected directly to the water main or in line with another booster pump. The minimum actual capacity of the cold water storage cistern should be not less than 225 litres (50 gallons). The capacity of the hot water cylinder must be capable of meeting anticipated demand.
What is the maximum static pressure of Aqualisa SmartValve?
Pressures: The standard (unpumped) Aqualisa SmartValve™ is designed to operate up to a maximum static pressure of 700kPa ((7 bar) (100psi)). Where pressures are likely to exceed 700kPa ((7 bar)(100psi)), a pressure reducing valve must be fitted to the incoming mains supply. A setting of 400kPa ((4 bar) (60psi)) is recommended. It should be noted that daytime pressures approaching 600kPa ((6 bar)(80psi)) can rise above the stated maximum overnight.
How old do you have to be to use Aqualisa?
This appliance can be used by children aged from 3 years and above and persons with reduced physical, sensory or mental capabilities or lack of experience and knowledge if they have been given supervision or instruction concerning use of the appliance in a safe way and understand the hazards involved. Children shall not play with the appliance. Cleaning and user maintenance shall not be made by children without supervision. This product must be installed by a competent person in accordance with all relevant current local and national Water Supply Regulations. ALL PRODUCTS REQUIRING AN ELECTRICAL CONNECTION MUST BE INSTALLED BY A QUALIFIED PERSON FOLLOWING THE LATEST REVISION OF THE ELECTRICAL WIRING REGULATIONS, BOTH NATIONAL AND LOCAL AND CERTIFIED TO CURRENT BUILDING REGULATIONS. This system should be installed so that other taps or appliances operated elsewhere within the premises do not significantly affect the flow. The Aqualisa SmartValve™ must not be used with a hot water supply temperature of over 65ºC. If the maximum hot water temperature is likely to rise above 65ºC then a Thermostatic Blending Valve must be used. The Aqualisa SmartValve™ is supplied factory pre-set at maximum temperature of 45ºC. The maximum temperature is fully adjustable to suit site conditions. If adjusted, we recommend the outlet temperature is set to a MAXIMUM of 46ºC. The Aqualisa SmartValve™ must be installed in an accessible location for servicing and maintenance. The Aqualisa SmartValve™ must not be installed in situations where either the ambient temperature is likely to exceed 40ºC or where freezing may occur. The controller must not be installed in situations where the ambient temperature is likely to fall below 5ºC or rise above 40ºC. We do not recommend the use of a controller in steam
What size pipe is needed to connect a stainless steel tube?
cut using a rotary type cutter and lubricated using a silicone grease, petroleum jelly, or similar, prior to insertion into the fitting. 15mm pipework must be used to connect the product. If plastic pipe is used, the tube insert must not increase the tube diameter or extend the cut-off length by more than 2mm. THESE FITTINGS ARE NOT SUITABLE FOR STAINLESS STEEL TUBE. COMPRESSION FITTINGS MUST NOT BE USED.
Is the base of the AQUALISA smart valve higher than the base level of the CISTERN?
NB: THE BASE OF THE AQUALISA SMART VALVETMMUST BE SITED NO HIGHER THAN THE BASE LEVEL OF THE CISTERN
How to remove Aqualisa shower cover?
Answer: Most Aqualisa shower covers are pretty easy to remove. All you have to do is pull off the loose attachments by hand. For the tighter ones, use a screwdriver to pry them off. But if the cover is set with screws, you may need to remove it with a screwdriver.
Why is Your Aqualisa Shower Leaking?
So you’re in a nasty situation and you desperately want to fix the leak. Just like your Hydramax shower dripping, there are a few reasons behind this.
What is a shower valve?
Now you may wonder what a shower valve is. Think of it as a fitting that controls the amount of water getting into your shower. Without it, the excess water could cause water pooling in your shower tray . Other than controlling the water flow, a shower cartridge helps regulate the water temperature.
Why does my Hydramax shower leak?
Just like your Hydramax shower dripping, there are a few reasons behind this. First of all, a leaking shower can be caused by a faulty O-ring. Or, it could also happen if your shower cartridge has been damaged. If those two things went over your head, no worries.
What is an O ring in a shower?
As the name suggests, an O-ring is a small rubber circle located inside the shower. Their main purpose is to prevent any water from leaking or dripping. This leaking water could be the reason behind a low-profile shower tray overflowing .
How to install Aqualisa shower head?
In this video I'll be showing you how to install an Aqualisa easy fit wall mounted fixed head. Cut the outlet pipe to length 55 to 150 millimetres measured from the finished wall surface. Slide the spacer onto the projecting pipe flush with the finished surface. Ensure the pipe is clean and free of dust and slide the fixing bush onto the pipe flush with the wall spacer. Fit the 15-millimetre O-ring against the end of the fixing bush mark the four fixing points. Slide the fixed head arm over the fixing bush flush with the wall surface. Carefully remove the fixed head arm drill and prepare the fixings, take care to avoid pipe work hidden in the wall. Refit the shower arm and secure it to the wall using the screws provided.
How to install Aqualisa bath filler?
Carefully, unscrew and remove the bath waste clicker assembly from the waste body and set aside. Unscrew and remove the overflow filler outlet from the body assembly and set a side. Offer the outlet body assembly into position at the rear of the bath, ensuring the rubber washer is aligned past the overflow filler outlet through the bath and secured to the body assembly .
How to fix a shower control?
Holding the wall plate on the wall in the desired location for the shower control mark fixing points. Drill and prepare the wall fixings for the controller using the fixings provided. Ensure the data cable is held securely by the narrow middle slot of the mounting plate and fixed to the wall using the screws provided.Flip the data cable into the rear of the controller and slide onto the mounting plate.
How does Aqualisa shower work?
A smart shower works by separating the valve from the control. The beauty of this is a simpler and more flexible installation. Allowing the box can be sited up to 10 metres away from the shower itself. For example, the smart valve can be sited in the loft, an airing cupboard, or even under the bath just remember this must be accessible for future services.
How to fix a quartz diverter?
Fix the diverter into place using the adjustable feet. Connect the blended supply pipes from the diverter to the bathroom feeds. Remove the lids from the diverter and the Quartz valve. Connect the 2 meter patch lead cable from the secondary port of the Quartz valve and the first port of the diverter. Replace the lid to the smart valve and diverter and secure using the fixing screws. Ensure that all isolation valves are fully open.
How to connect a bath waste to a blended supply pipe?
Offer the bath waste into position ensuring the rubber washer is correctly aligned between the waste assembly in the bath base. Pass the bath waste clicker through the bath and secure to the waste body assembly. Connect the bath waste to a suitable waste pipe.
How to connect a quartz valve to a diverter?
There are two possible wiring configurations. For Visage, Viso, and Zuri the main controller cable plugs into the diverter. Connect the 2-meter patch lead cable from the secondary port to the diverter and the first port of the Quartz valve.
