
How do you build a raised platform deck?
- Foundation.
- Pour concrete.
- Ledger.
- Place steel connectors – the strongest way to attach posts to concrete.
- Cut posts using your ledger as a height reference.
- Set the beam on top of your posts and check beam alignment.
Full Answer
How to build a simple and sturdy stage platform?
Start with a plan
- From barren space to favorite place. Four years ago, Jenna and Jake bought a small house and got . ...
- A simplified layout method. ...
- Easy, adjustable footings. ...
- Complete the rim. ...
- Level the rim. ...
- Hang the joists. ...
- Deck it! ...
- Finish up with fascia. ...
- Project Plans
How do I build a wooden platform?
- Prop the frame assembly up 1 ½ inches from the ground. ...
- Line one of the side apron pieces even with the ends of the frame assembly with a 1 ½-inch over hang on the top edge.
- Clamp into place.
- Measure and drill the holes for the bolts 3 ¼ inches down from the top edge and 1 ½ inches on the overhang side.
- Do this at 8, 29, 52 and 73 inches. ...
How to build a DIY lifting platform?
Steps Download Article PRO
- Place the first set of plywood boards on a solid, flat surface. ...
- Place the second set of plywood boards on top of the first set. ...
- Use the package of 1 1/2 screws for this step. ...
- Have two people ready––this step requires two people. ...
- With the tape measure, straight edge and utility knife, cut the rubber mats into four 2' x 4' sections (see image).
How to build a shed platform?
- Determine the size and style of your shed. There are a lot of options to choose from. ...
- Create a drawing. You can do this on your own, hire a professional designer, or purchase ready-made shed plans online.
- Determine the shed location. If possible, build the shed on ground that is within 6-inches of being level. ...
- Get a building permit. ...
Considerations and Planning Your Deck
This guide covers how to build a raised deck or elevated deck. In many areas, an elevated deck is defined as one that is higher than inches above the ground and is attached to the house. Raised decks require a railing around the perimeter, and they require a building permit.
Layout Footings and Attach the Ledger Board
A raised deck is attached to the house by a ledger and supported on the opposite end by posts set on top of piers. The terms “piers” and “footings” are often used interchangeably though they are technically not the same thing. Piers transfer the deck’s weight into the soil. Footings spread the weight out over a larger area.
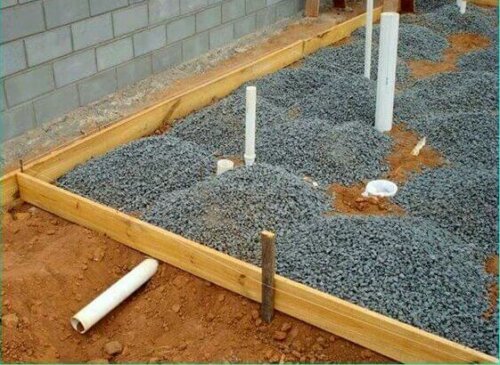
Dig Holes for Footings and Pour Concrete
Use a posthole digger or power auger to dig holes for the piers and footings.
Build Beams on Top of Posts
Add post caps to the top of the posts to prepare for the beam that will run across them. Use post-base hardware nails or screws.
Install the Joists
If you install the rim joists first, the rim can establish the deck’s perimeter. If your deck design uses a flush beam, attach the rim joist to each end of the ledger and the flush beam. If your deck design calls for the joists to sit on top of the beam, attach a rim joist on each end of the ledger and rest them on the beam.
Install the Railing Posts
Before you install the decking, you’ll need to install the structural railing posts for the deck railings. There are a few ways in which railing posts can be installed. In the example project, the 4 x 4 posts were attached to the inside of the rim joists.
Install the Decking
To start the decking so that it’s parallel to the house, align the edge of the first deck board so that it is parallel to the house and run the fasteners in. Let the ends run long on either side.
