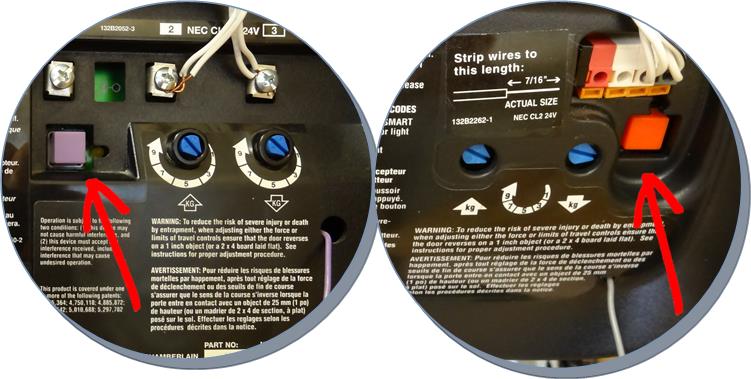
- Separate the two conductors and strip a 7/16 inch of insulation from each conductor on one end of the wire.
- Connect one wire to each of the two screws on the back of the door control and tighten the screws. The wire can be connected to either screw.
- On the other end of the wire strand, separate the wires and strip another 7/16 inch of insulation from each end
- Connect one wire into the red terminal and the other wire into the white terminal next to the red on the motor unit

How to open a garage door with an opener manually?
The Hard Way
- Unwind the coat hanger. ...
- Go to the center of the door. ...
- With the hanger reach for the emergency release lever. ...
- Remove the hanger from between the door and frame.
- If you were able to disengage the door you should be able to open the door by hand. ...
How to secure your garage door opener?
Increasing Security
- Remove the handle from the emergency release cord. ...
- Cover the windows. ...
- Forget the automatic garage door opener. ...
- Install a wireless keypad. ...
- Install motion sensor lights. ...
- Secure the entry door to the house. ...
- Don’t leave the garage door remote in the car. ...
How do you fix garage door sensor wires?
- Measure the height of your garage door sensors.
- Place the box in the garage doorway, making sure the box is in front of the garage door sensors.
- Look at both the garage door sensors.
- Open the garage door and remove the crushed box.
- Clean the lenses with a soft cloth.
- Test the door with another cardboard box.
Which garage door opener should I buy?
The best overall garage door opener is the Chamberlain B1381 Bright LED Garage Door Opener (view at Amazon). When you download the associated app you can control your garage doors no matter where you are. If you're looking for a budget pick, check out the BeamUP Workhorse BU100 Garage Door Opener (view at Amazon). It’s easy to set up and it opens garage doors of virtually any size.

How do you wire a switch for a garage?
0:002:06Wall Switch for Electric Garage Door Installation - YouTubeYouTubeStart of suggested clipEnd of suggested clipWhatever type of controller you're getting there's going to be two screws on the back labeled redMoreWhatever type of controller you're getting there's going to be two screws on the back labeled red and white and you connect the red or white wire to them.
What wire do I use for garage door opener button?
Use a 2 conductor 22 gauge bell wire for this task. Connect the white/red wire to terminal labeled 1 or R (red) and tighten screw snuggly. Connect the white wire to terminal labeled 2 or W (white) and tighten screw snuggly.
How does a garage door button work?
A garage door system may seem complicated, but it's really just a radio transmission system. When you push the button on your garage door opener remote or inside your garage, the transmitter sends a code to the receiver, which is tuned to the same frequency as the transmitter.
Is a garage door button low voltage?
Garage Door Opener Wiring Garage door openers use a receptacle in the ceiling for power. The wired controller and sensors use low voltage wiring (usually 24V) to connect to the motor unit.
Why is my garage door wall button Not Working?
If pressing the button on your garage door's remote control doesn't work, check the batteries first. Simple but true, the remote transmitter needs power to send a signal to your opener. If batteries aren't the issue, be sure you're pressing the button within range of the opener.
How many volts is a garage door opener button?
All residential garage door openers manufactured for use in the United States and Canada are rated for 120V AC, 60Hz line power.
Why are there 3 buttons on my garage door opener?
Why are there 3 Buttons on a Garage Door Opener? A 3-button universal garage door opener remote allows you to operate upto three garage doors with the same remote. If you have three garage doors then you can program each button to open & close a specific garage door. They do not even have to be in the same place.
Why won't my garage door open when I push the button?
If you press the button and the door fails to activate, something might be blocking the signal. Alternately, you might be out of range. There is also the possibility that the remote antenna on the opening device has been obstructed or damaged.
What size wire is used for garage door opener sensors?
18 to 22 gaugeIt is 18 to 22 gauge.
How do you attach a button to your garage?
0:192:15How to program the garage door opener in your car in 3 easy stepsYouTubeStart of suggested clipEnd of suggested clipAnd 3rd buttons with your hands for about 15 to 20 seconds. Until you see the red indicator lightMoreAnd 3rd buttons with your hands for about 15 to 20 seconds. Until you see the red indicator light flash repeatedly you take a look at my light you'll see it flash right. Now. The program your vehicle.
How do you wire down a stop switch?
0:081:45How-To: Wire 2 Nice Garage Door Push Button Stations - YouTubeYouTubeStart of suggested clipEnd of suggested clipTogether here are two fantastic push button stations. Step one unplug your power. Step two removeMoreTogether here are two fantastic push button stations. Step one unplug your power. Step two remove the jumper in the box with that huge sticker on it you can't miss. It.
How many wires do you need for a garage door opener?
Notes: If uncertain of the brand of operator, a four wire run from one floor location to the other floor location will cover any brand. Both these circuits need a minimum of two wires but four wire is better, 22 gauge or better with a tracer for polarity identification.
How many inches between staples on a garage door opener?
You can leave 6 inches between each staple and secure them with a hammer. Once you reach the opener, attach the wires to the motor terminals. You will see two holes for the button connection indicating where to put them. Always check your owner’s manual to see if there is a different placement for the button terminals.
How many buttons does a wall panel have?
You can check various models in most electrical and hardware stores. Some models come with a three-button wall panel and others are just the simple push type. If your warranty will replace the original, non-functioning wall button, this is the time to use it.
Do garage door openers come with a button?
Naturally, all garage door opener packages come with a wall button. Depending on the model and manufacturer it works with either a battery or a wire. In some cases, you can buy universal buttons. These will work with a wide selection of openers, but there are always some exceptions.
Step 1: Things You Need
Things I used to complete the project: - Working garage door opener - Momentary push button. + I used a power button from an old PC + I think any momentary close switch should work like this one from Radio Shack. - Dremel tool - Drill / Drill bits - Wire cutters - Wire strippers - Soldering Iron - Wire (I used some from the PC switch) - Multi-meter (to verify the switch would work for the application) - I also used some super glue for my switch..
Step 2: Adding the Button to the Garage Door Opener
First I snapped apart my opener which consisted of the plastic front, back, button, circuit board, and battery. Removed the battery and the circuit board. I found where the original button was on the circuit board. It had 4 leads. My switch had long enough wires already attached to it.
Step 1
Locate the terminals on the garage door opener marked for the installation of the switch. Do not confuse these terminals with the reversing photo-eye terminal.
Step 2
Insert the low-voltage wire into the terminal and press until it is fully seated.
Step 3
Locate the spot where the second switch will be installed. The switch needs to be at least five feet from the ground and out of reach of children.
Step 4
Run the low-voltage wire from the operator to the switch, first along the ceiling and then the wall.
Step 5
Straddle the wire with the insulated staples and tap them into the wall using a hammer. Be sure not to damage the wire.
Step 7
Unscrew the terminals with a screwdriver until the wires will fit underneath the screws.
Step 9
Insert the mounting hardware screws into the switch's mounting holes and screw into the wall.
